I'm old & inherently don't like the rotary dial for the transmission. My 1998 has the column shifter, but every other SUV/CUV we've had since then has had the floor/console shifter. Plus I think it looks better.
Conventional wisdom on doing this entails buying a lot of expensive stuff used. If you were to buy new, the cost would be over $1,300 (this is for a 2015 RT with DVD player):
Item PN Cost
Console base (reinforcement) 68372487AA $217 (used $180 shipped, $50 shipping)
Console bezel 6FC271Z7AC $551 (used $180 with upper handle)
Shifter base 68322226AC $269 (used $65)
Shifter handle 6FE062CCAC $220 (used, part of bezel above, usually over $100)
Wire harness 68381783AA $58 (cheaper to buy new)
Total new $1,315 plus shipping, used $491
*
EDIT- My parts/tools list (updated 8/4/24):
Used parts-
Total cost estimate with shipping around $150-190
If you want to avoid the aggravation of the shifter/boot, you could buy a used bezel for around $120-180.
*
EDIT- My wiring harness research:
In the online parts listing, there are 4 of them. Here's what it looks like to me:
The harnesses are segregated by either AWD/RWD, and then with or without CD/DVD in console. Here's a summary:
68381782AA AWD w/ DVD-CD in console
68381783AA RWD w/ DVD-CD in console
68381784AA RWD w/o DVD or CD in console
68381785AA AWD w/o DVD or CD in console
Even used you're looking at several hundred dollars for these parts, and then you have to remove the entire console. What if there was an easier and less costly way?
I took my 2015 RT apart in this area, and here's what I found:
Once the bezel is off (AlldataDIY says to have the shifter in neutral for this), you have an area below where the shifter base could likely mount. I looked at pictures of both the 2014-17 and 2018+ console brackets and the 2018+ is flat and has 4x M6 foldover type nuts to hold the shifter. The 2014-17 is mostly flat in this area, but has a slight step. There is a raised area that must be trimmed back to allow the shifter to be mounted.
My plan:
There are three areas to address here-
1 . Mounting of shifter base,
2. Wiring of shifter, and
3. Shift boot adapter
Mounting the shifter base-
After the shifter arrived the bad news is it's a lot larger (about 144mm x 76.5) than I thought. It won't fit onto the console bracket lengthwise as-is, but it is close. Width should not be a problem. I used a Dremel and trimmed away the bracket where the shifter needs to sit.
Here's a pic where I initially set it in approximate place, the back part hits the raised portion of the bracket:
![Image]()
This pic shows where the support bracket must be cut/trimmed. If I had a better tool, this would have taken a lot less time. I ended up using a Harbor Freight tool and toothed blade that had a shaft made out of anodized butter. I had to straighten it a couple of times. I measured my full 3D printed plate and it was 127 long x 101 wide. Since the shifter base needs 144 x 77, I'm good for width, just need more length.
![Image]()
(The below section has relevant info for mounting the shifter)
This shows the shifter base in approximate position with the bezel on top with the new boot adapter (more on that below). A note here, I misread the directions and pulled out the wrong part of the bezel to do this. I broke the tabs that hold this in place, so I'm planning on either 2 sided tape or gluing it back in since it's not designed to be removable.
![Image]()
I have laid out a larger plate, and added holes for the two positioning tabs. I omitted the four mounting bolts as it is easier and more accurate to mark and drill them once the shifter base is in place. That piece will take over 7 hours to print at 100% quality! I test printed a prototype at 10% quality to see how everything lined up. This piece will be held to the console bracket by at least 3 smaller well nuts and flat head screws in countersunk holes. The new base adapter is thick enough to drill and tap. One other consideration is how high the shifter will sit in relation to the boot. The toughest part is behind now that I trimmed the bracket.
As of 8/1/24, I have installed the shifter. Here are relevant pics:
Here is the console bracket with the 3/8" holes drilled for the 10-32 wellnuts:
![Image]()
This shows the wellnuts in place:
![Image]()
Here is the bracket screwed into place. The three screws seemed to make it sturdy enough.
![Image]()
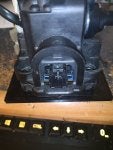
Here is the shifter in place- I managed to block out most of the bolt heads in the picture. Note that it is best to use flanged bolts here, as they have a reduced head size. Since the plate is thicker at the rear, I used 30mm long bolts there and 25 up front. It's easy to get an 8mm socket in to tighten them. Keep in mind when tightening you're going into plastic. The wiring plug is easily accessible.
![Image]()
I used some silicone glue I had on hand and clamped the boot with some clothespins and spring paper clamps. So far, so good. Here's the final version installed (the radio is still a work in progress, disregard the wiring). The letters light up, and AlfaOBD recognizes it as a 2018+ electronic shifter.
![Image]()
(End of updates)
I found both parts for the shifter from a seller on eBay. You have to pull teeth here, as the junkyards that sell this stuff rarely take pictures or accurately describe what they have listed. In my case, I inquired about a 2018 "shifter assembly" and verified in writing it included the top and bottom pieces. I got it for $96 shipped with tax.
The wiring and shift boot were moved to subsequent posts since I had exceeded the number of attachments.
The only downside as with this type of conversion is no manual shifting. From what I read on a thread in the HP Tuners forum, you could possibly have this via a transmission control module from a 2018+ truck. There was also some discussion about using AlfaOBD to change the type of shifter present. I have not followed up on either of those.
Total cost involved here:
Shifter, used, top & bottom, $96 shipped on eBay
Well nuts M6, $8 for 10 shipped on eBay
Connector, $15 shipped from mouser.com
End total: $119
Conventional wisdom on doing this entails buying a lot of expensive stuff used. If you were to buy new, the cost would be over $1,300 (this is for a 2015 RT with DVD player):
Item PN Cost
Console base (reinforcement) 68372487AA $217 (used $180 shipped, $50 shipping)
Console bezel 6FC271Z7AC $551 (used $180 with upper handle)
Shifter base 68322226AC $269 (used $65)
Shifter handle 6FE062CCAC $220 (used, part of bezel above, usually over $100)
Wire harness 68381783AA $58 (cheaper to buy new)
Total new $1,315 plus shipping, used $491
*
EDIT- My parts/tools list (updated 8/4/24):
Used parts-
- Shifter assembly, lower & upper, price varies, $80-$180
- TE Electronics or AMP PN 638393-5 wiring connector, under Mouser, Digikey, etc. under $2 plus $10 shipping. No terminals needed.
- 3x M5-.8 wellnuts to hold 3D plate to console base, Amazon 10 for $7. As an SAE alternative, I used 10-32 since that was all the HW store had.
- 2x M6x25 flange bolts (8mm wrench size) to hold shifter base front to console bracket, local HW store $2. Socket head bolts would also work here with washers. You could possibly use 1/4-20 if unable to get M6.
- 2x M6x30 flange bolts to hold shifter base rear to console bracket, local HW store $2
- 3x M5x 30 flat head screws to hold 3D plate to console (flush mount), local HW store $5. If using 10-32, get at least 1" long, 1.25" is better for the deeper rear location.
- Glue to re-glue boot to shifter/new retainer, $5 Some sites suggest "Shoe Goo" available at Walmart for bonding leather to plastic. I used some "silicone glue" I got from Amazon and then clamped it in place with clothespins and paper clamps until it set. So far so good.
- Zip is attached with the updated versions of the mounting plate and OEM boot retainer. Note since I can't attach a zip file, the file is a txt extension, so download it and rename it to zip. There is no password.
- Common sockets and screwdrivers depending upon the hardware used.
- Pick to remove existing terminals from shifter connector. Can grind down a small common nail to accomplish this.
- M6-1.0 tap
- Dremel with cutting blade to trim console brace.
- Drill and drill bits-
- One to drill holes for M5 or 10-32 screws, a 13/32 or 7/32 should work. A 3/16 worked for the 10-32, but would be too small for a 5mm. Use this same bit to mark where your wellnut holes need to be.
- One to bevel hole for 3D shifter mounting plate for mounting screws, varies by screw head size. For the 10-32 I used, this was a 23/64. Be careful not to go too deep. The rear mount can go deeper if needed.
- One to drill for M6 threads. Normally this is an M5, but since I was tapping into soft plastic, I used a slightly smaller 3/16. I was able to use this same size for marking the wellnut holes.
- One to drill holes for the wellnuts. For the 10-32, this was a common 3/8.
- 3D printer or source for same, I suggest Craftcloud. You can upload the files and get an instant quote in several materials from several makers. I suggest at least PLA Plus, ABS, or Nylon. The quote I got for the 2 files in July 2024 was under $15 shipped and would take about a week to get. Be sure to specify the boot retainer is only 20% or less infill so it remains flexible.
Total cost estimate with shipping around $150-190
If you want to avoid the aggravation of the shifter/boot, you could buy a used bezel for around $120-180.
*
EDIT- My wiring harness research:
In the online parts listing, there are 4 of them. Here's what it looks like to me:
The harnesses are segregated by either AWD/RWD, and then with or without CD/DVD in console. Here's a summary:
68381782AA AWD w/ DVD-CD in console
68381783AA RWD w/ DVD-CD in console
68381784AA RWD w/o DVD or CD in console
68381785AA AWD w/o DVD or CD in console
Even used you're looking at several hundred dollars for these parts, and then you have to remove the entire console. What if there was an easier and less costly way?
I took my 2015 RT apart in this area, and here's what I found:
Once the bezel is off (AlldataDIY says to have the shifter in neutral for this), you have an area below where the shifter base could likely mount. I looked at pictures of both the 2014-17 and 2018+ console brackets and the 2018+ is flat and has 4x M6 foldover type nuts to hold the shifter. The 2014-17 is mostly flat in this area, but has a slight step. There is a raised area that must be trimmed back to allow the shifter to be mounted.
My plan:
There are three areas to address here-
1 . Mounting of shifter base,
2. Wiring of shifter, and
3. Shift boot adapter
Mounting the shifter base-
After the shifter arrived the bad news is it's a lot larger (about 144mm x 76.5) than I thought. It won't fit onto the console bracket lengthwise as-is, but it is close. Width should not be a problem. I used a Dremel and trimmed away the bracket where the shifter needs to sit.
Here's a pic where I initially set it in approximate place, the back part hits the raised portion of the bracket:
This pic shows where the support bracket must be cut/trimmed. If I had a better tool, this would have taken a lot less time. I ended up using a Harbor Freight tool and toothed blade that had a shaft made out of anodized butter. I had to straighten it a couple of times. I measured my full 3D printed plate and it was 127 long x 101 wide. Since the shifter base needs 144 x 77, I'm good for width, just need more length.
(The below section has relevant info for mounting the shifter)
This shows the shifter base in approximate position with the bezel on top with the new boot adapter (more on that below). A note here, I misread the directions and pulled out the wrong part of the bezel to do this. I broke the tabs that hold this in place, so I'm planning on either 2 sided tape or gluing it back in since it's not designed to be removable.
I have laid out a larger plate, and added holes for the two positioning tabs. I omitted the four mounting bolts as it is easier and more accurate to mark and drill them once the shifter base is in place. That piece will take over 7 hours to print at 100% quality! I test printed a prototype at 10% quality to see how everything lined up. This piece will be held to the console bracket by at least 3 smaller well nuts and flat head screws in countersunk holes. The new base adapter is thick enough to drill and tap. One other consideration is how high the shifter will sit in relation to the boot. The toughest part is behind now that I trimmed the bracket.
As of 8/1/24, I have installed the shifter. Here are relevant pics:
Here is the console bracket with the 3/8" holes drilled for the 10-32 wellnuts:
This shows the wellnuts in place:
Here is the bracket screwed into place. The three screws seemed to make it sturdy enough.
Here is the shifter in place- I managed to block out most of the bolt heads in the picture. Note that it is best to use flanged bolts here, as they have a reduced head size. Since the plate is thicker at the rear, I used 30mm long bolts there and 25 up front. It's easy to get an 8mm socket in to tighten them. Keep in mind when tightening you're going into plastic. The wiring plug is easily accessible.
I used some silicone glue I had on hand and clamped the boot with some clothespins and spring paper clamps. So far, so good. Here's the final version installed (the radio is still a work in progress, disregard the wiring). The letters light up, and AlfaOBD recognizes it as a 2018+ electronic shifter.
(End of updates)
I found both parts for the shifter from a seller on eBay. You have to pull teeth here, as the junkyards that sell this stuff rarely take pictures or accurately describe what they have listed. In my case, I inquired about a 2018 "shifter assembly" and verified in writing it included the top and bottom pieces. I got it for $96 shipped with tax.
The wiring and shift boot were moved to subsequent posts since I had exceeded the number of attachments.
The only downside as with this type of conversion is no manual shifting. From what I read on a thread in the HP Tuners forum, you could possibly have this via a transmission control module from a 2018+ truck. There was also some discussion about using AlfaOBD to change the type of shifter present. I have not followed up on either of those.
Total cost involved here:
Shifter, used, top & bottom, $96 shipped on eBay
Well nuts M6, $8 for 10 shipped on eBay
Connector, $15 shipped from mouser.com
End total: $119