Similar instructions have been posted on the Dodge Forum but not here. So if this helps you out, great.
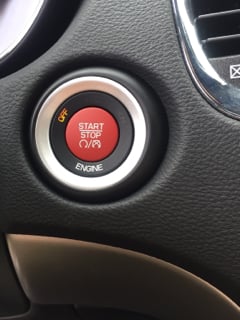
First here is the part number for the red SRT style starter button: 1UL96XR4AA
Tools you will need:
1/4 inch drive socket wrench and small extension, 7mm socket (for removing bolts around NAV unit)
3/8 inch drive socket wrench or box wrench, 13mm (for disconnecting negative battery terminal lead under passenger seat)
Trim sticks (can get a set from AutoZone) $15.00
OEM/Trim and molding removal set (25314) | Molding and Trim Remover Tool | AutoZone.com
First step is to remove the trim bezel from around your radio using trim sticks. Gently pry at the top and work your away across. You will hear it pop. Gently and evenly pull it towards you and work your way towards the bottom.
![]()
Now that you have the trim removed you can simply unplug the electrical connector from the bezel and put aside if you wish. Next you need to remove the four 7mm bolts holding the NAV screen in place. After doing so, simply pull the unit straight out and gently hang it out of the dash. No need to completely disconnect it, unless you really want to.
![]()
Next reach inside the dash and unplug the wire, pictured below. You have to do this before you remove it. The picture below is for reference. The starter must be plugged back in after it is installed because it will not go through the opening in the dash. The connector only goes on one way. Simply squeeze the connector on the tab towards the back and pull down to disconnect.
The assembly can be a little difficult to get out. What I had to do was reach in with my right hand and grab the back of the starter assembly, after the cable was unplugged, lift up on the back of the assembly, squeeze the bottom most release tab, and hold it with my middle finger whiles pushing downward and outward at the same time to remove the assembly. There are two more tabs on the top of the assembly that you can not get to when it is in the dash. That it is why I suggest you remove as I describe. I had some difficulty getting it out because I could not get the top to release but it eventually popped out after doing what I just described.
Next remove the plastic trim piece from the old starter after you remove it from the dash, there are little clips holding it on, simply gently pry up with your fingers to remove, and place around the new red one. The fat part of the trim piece will go towards the passenger side when re-inserted into the dash.
![]()
Now that you have the new starter back in the dash, reach in and plug the wire back in. It only goes in one way. The picture is just showing you the connector. Do not plug it back in until it is back in the dash.
Put back your NAV screen and the 4 bolts.
Plug your trim bezel back in (if you disconnected it) and put it back on the reverse order you removed it. Start the tabs from the bottom and gently pop them back in being sure the clips are lined up with the holes. Do not force anything, it goes back on fairly easily. So if you are forcing it, something is not lined up.
Don't forget to re-attach your negative battery terminal.
![]()
That's it, now you are done.
First here is the part number for the red SRT style starter button: 1UL96XR4AA
Tools you will need:
1/4 inch drive socket wrench and small extension, 7mm socket (for removing bolts around NAV unit)
3/8 inch drive socket wrench or box wrench, 13mm (for disconnecting negative battery terminal lead under passenger seat)
Trim sticks (can get a set from AutoZone) $15.00
OEM/Trim and molding removal set (25314) | Molding and Trim Remover Tool | AutoZone.com
First step is to remove the trim bezel from around your radio using trim sticks. Gently pry at the top and work your away across. You will hear it pop. Gently and evenly pull it towards you and work your way towards the bottom.

Now that you have the trim removed you can simply unplug the electrical connector from the bezel and put aside if you wish. Next you need to remove the four 7mm bolts holding the NAV screen in place. After doing so, simply pull the unit straight out and gently hang it out of the dash. No need to completely disconnect it, unless you really want to.

Next reach inside the dash and unplug the wire, pictured below. You have to do this before you remove it. The picture below is for reference. The starter must be plugged back in after it is installed because it will not go through the opening in the dash. The connector only goes on one way. Simply squeeze the connector on the tab towards the back and pull down to disconnect.
The assembly can be a little difficult to get out. What I had to do was reach in with my right hand and grab the back of the starter assembly, after the cable was unplugged, lift up on the back of the assembly, squeeze the bottom most release tab, and hold it with my middle finger whiles pushing downward and outward at the same time to remove the assembly. There are two more tabs on the top of the assembly that you can not get to when it is in the dash. That it is why I suggest you remove as I describe. I had some difficulty getting it out because I could not get the top to release but it eventually popped out after doing what I just described.
Next remove the plastic trim piece from the old starter after you remove it from the dash, there are little clips holding it on, simply gently pry up with your fingers to remove, and place around the new red one. The fat part of the trim piece will go towards the passenger side when re-inserted into the dash.

Now that you have the new starter back in the dash, reach in and plug the wire back in. It only goes in one way. The picture is just showing you the connector. Do not plug it back in until it is back in the dash.
Put back your NAV screen and the 4 bolts.
Plug your trim bezel back in (if you disconnected it) and put it back on the reverse order you removed it. Start the tabs from the bottom and gently pop them back in being sure the clips are lined up with the holes. Do not force anything, it goes back on fairly easily. So if you are forcing it, something is not lined up.
Don't forget to re-attach your negative battery terminal.

That's it, now you are done.


")