

I gathered all the necessary information by searching online forums, Facebook and YouTube. I really only found one general source for the Durango otherwise many installs were for the Charger, Challenger and Grand Cherokee. So I decided to compile all the information and make this post for my 2016 R/T. There are minor differences between all platforms which small modifications had to be made most notably dealing with the emissions control vacuum harness.
I did not do the complete install at one time. This actually took me a couple weeks as I was waiting for parts and did a lot of the wiring before I even swapped the intake manifolds. I would say I have a total of about 15 working hours. You could probably slap this on and have everything wired in 3-4 hours and functional but I took my time and made it look as factory as possible. I did more than the average person would based on personal preference (aka my OCD) which you will see in the pictures. Enjoy!
Parts needed:
•6.4L/392 intake manifold from any Dodge/Jeep/Chrysler SRT vehicle
•Short runner valve (SRV) actuator (05038529AC)
•Short runner valve (SRV) wiring pigtail (68064996AA)
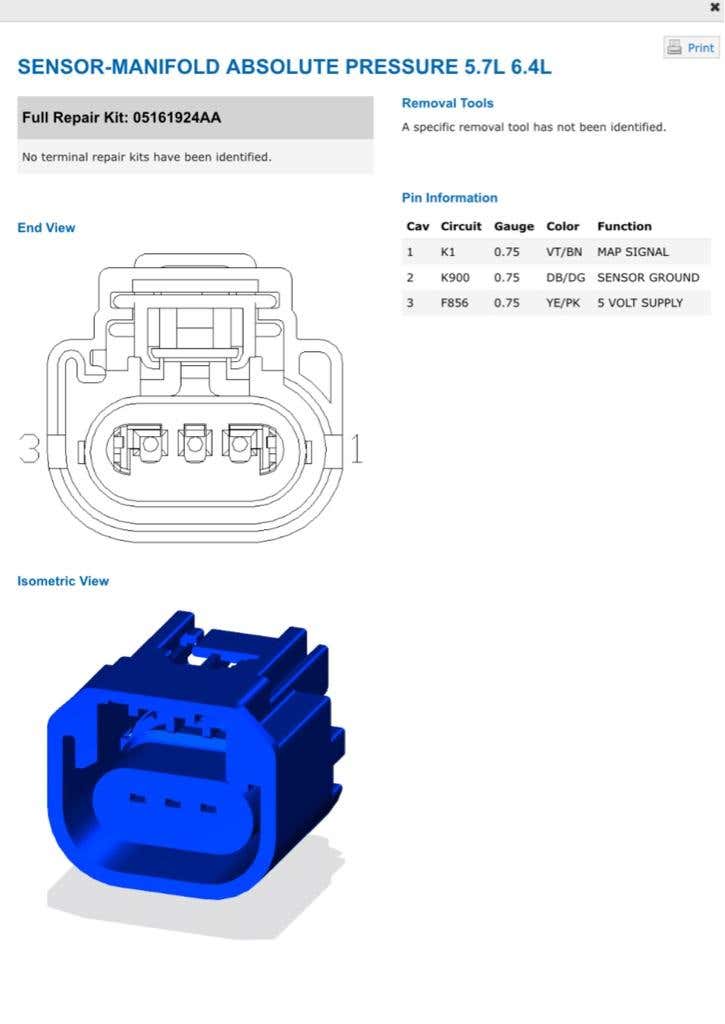
•MAP sensor (68271094AB)
•PCV Valve Cap (05038532AA) *5.7L will not fit correctly
•MSD 8969 digital RPM window switch
•Painless Performance 70213 Cirkit Boss or 30/40 AMP waterproof relay
•In-line waterproof fuse holders (3) if using the 30/40 AMP relay
•Micro2 tap-a-fuse
•Air intake (OEM or aftermarket for 6.4L Durango SRT) or modify current intake
•20 gauge colored primary wire
•16 gauge colored primary wire
•Split wire loom (1/8”, 1/4”, 3/8”, 1/2”)
•Tessa tape (high heat exterior)
•Super 33+ electrical tape
•Adhesive lined heat shrink tubing
•Zip ties
•Soldering iron
•Ring terminal electrical connector
•3/8” fuel line quick disconnect tool
•Blue threadlocker
Optional:
•6.4L/392 engine half covers (05281359AA & 052813358AA)
•New intake manifold gaskets (Mahle MS19825)
•New throttle body gasket (Mahle G32511)
Swappable parts from the 5.7L:
•PCV breather hoses
•Throttle body (*I upgraded to a BBK 85mm p/n 1842)
•Brake booster vacuum hose
•Fuel rail and fuel injectors
•Oil filler cap
Wiring Extensions:
•MAP sensor (8”)
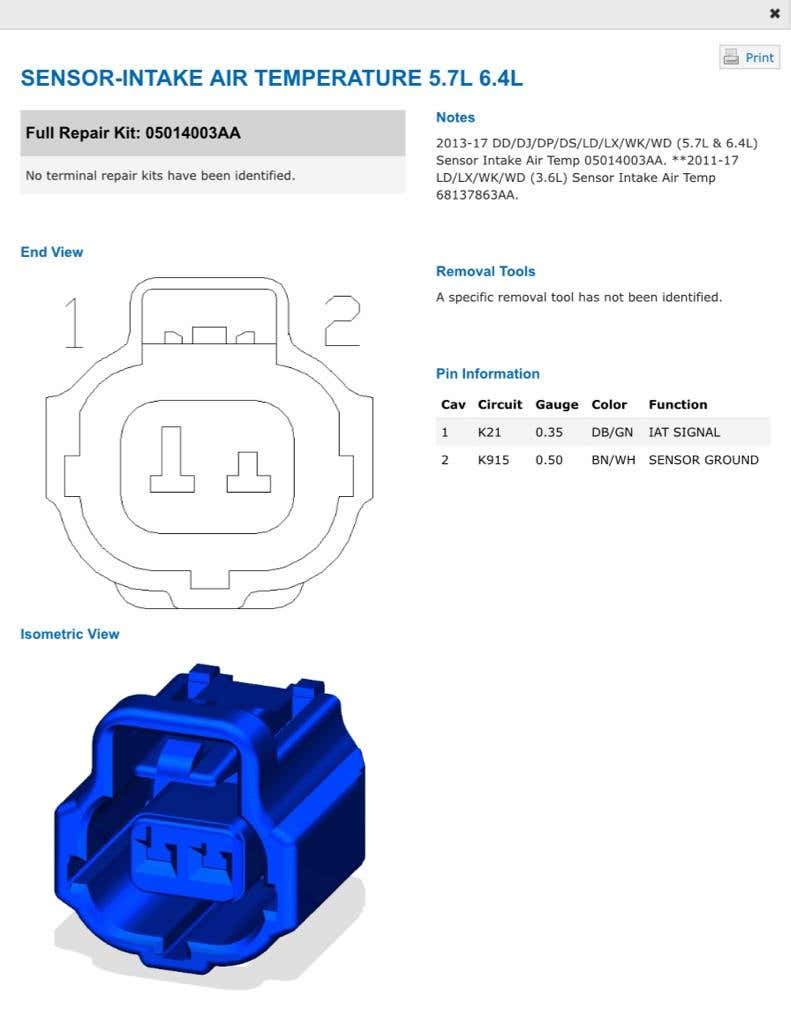
•IAT sensor (4”)
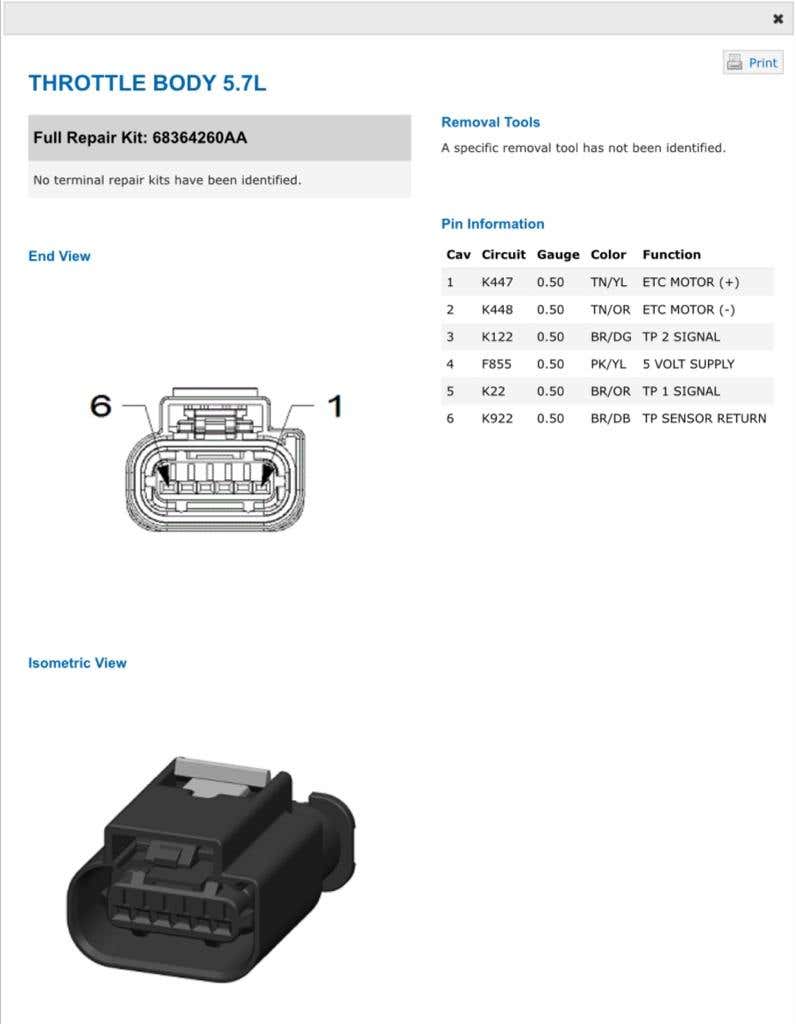
•TPS (16”)
Wiring Connections:
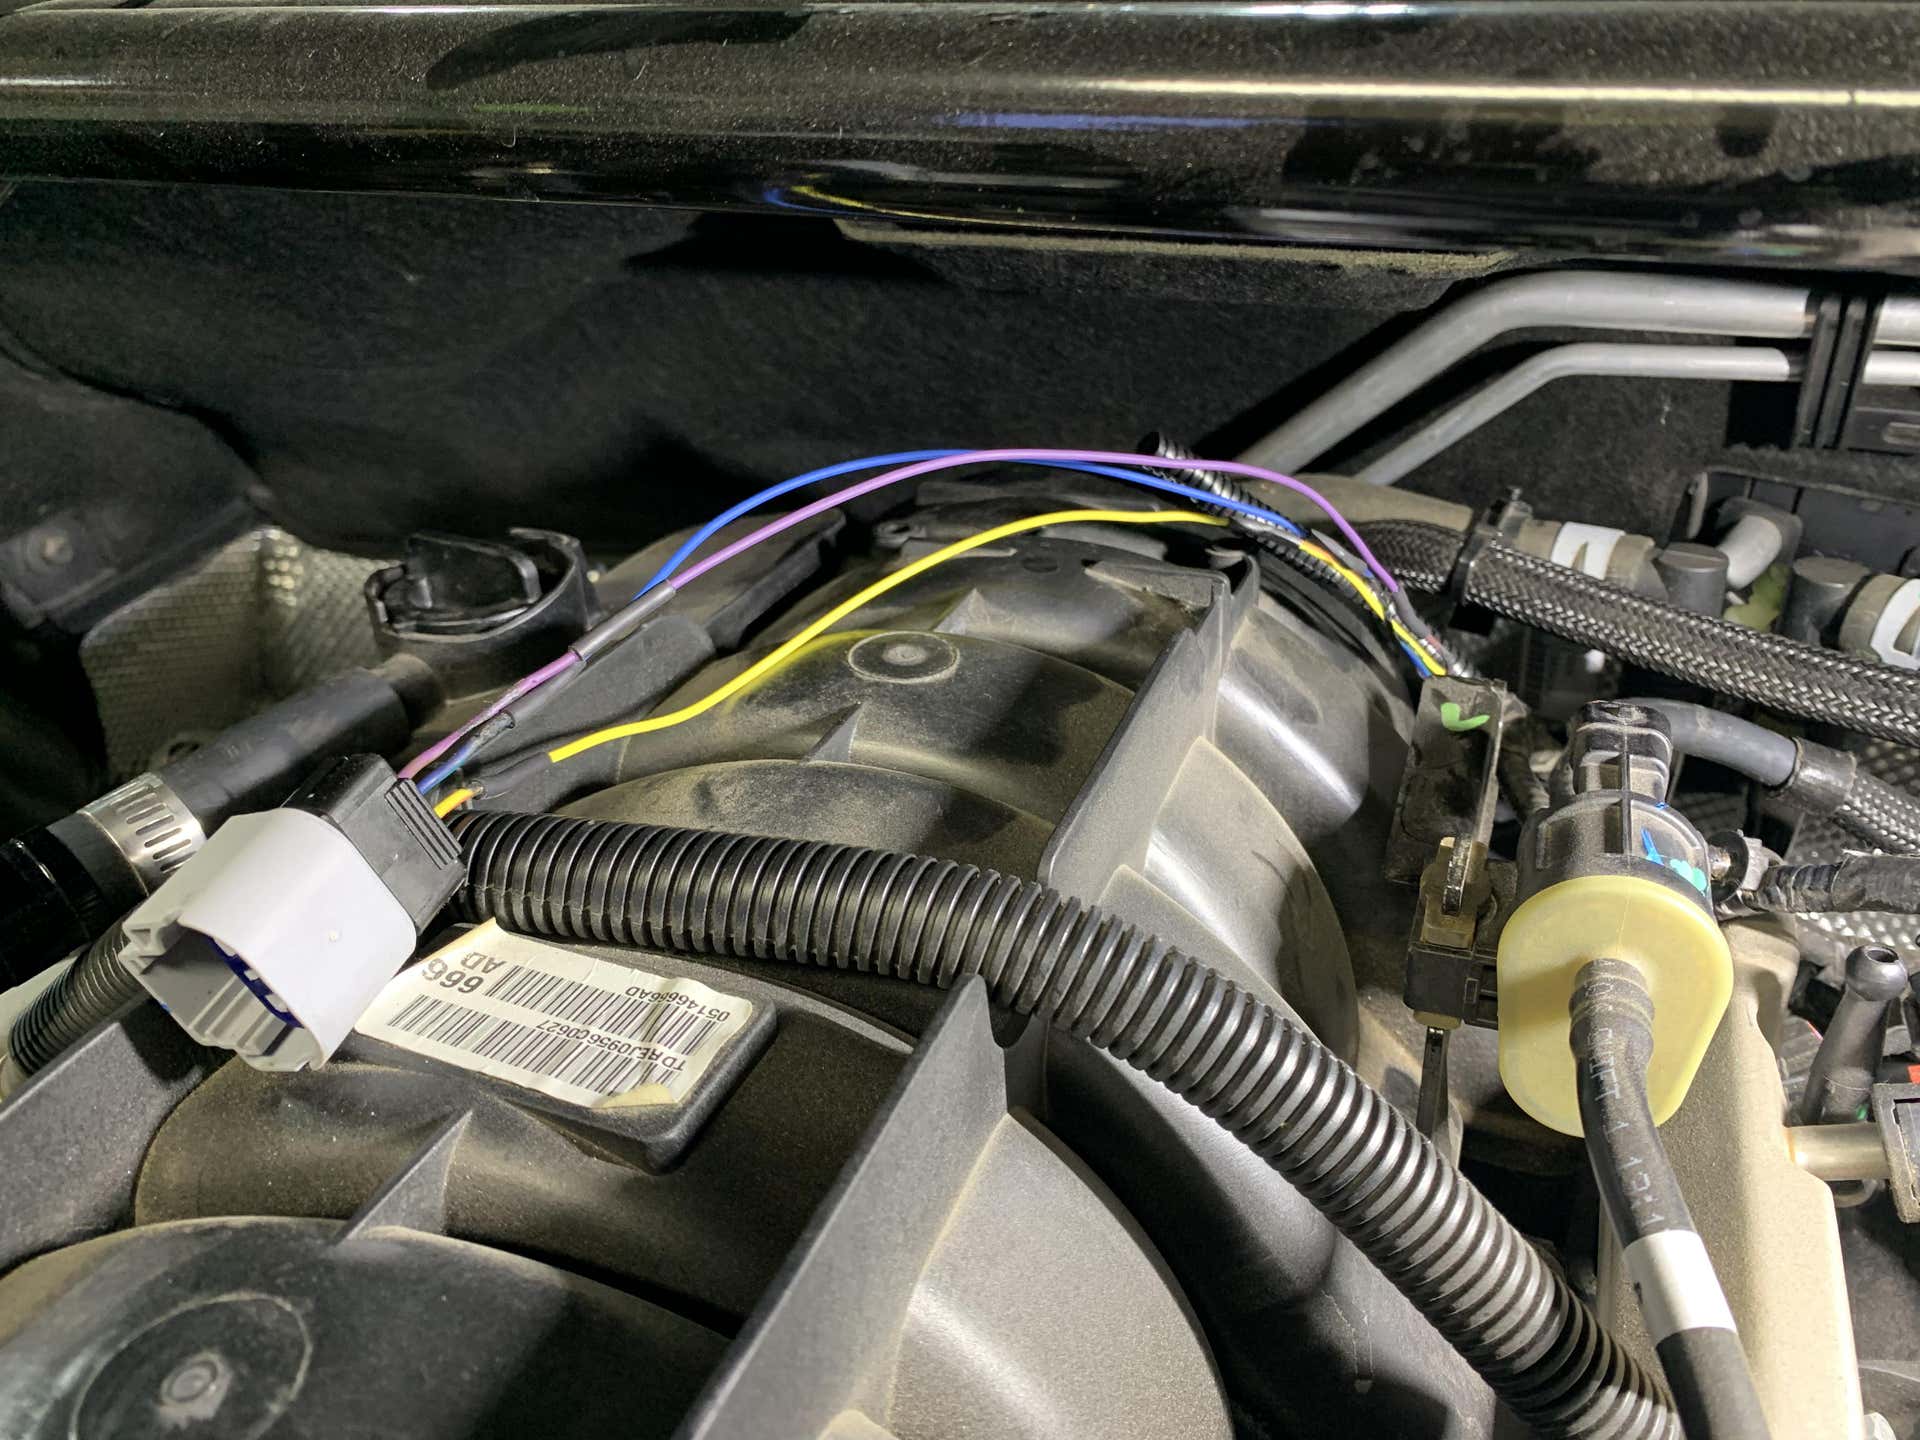
SRV connector clip (p/n 68064996AA) facing up L to R from the rear (1-2-3-4)
Pin #1 (blue) - Pin 87 on relay (blue)
Pin #2 (black) - Ground
Pin #3 (yellow) - MSD yellow
Pin #4 - Not used
MSD Box (settings: mode=1, on=4,400rpm-4,800rpm off=8,000rpm)
Gray - Not used
Black - Ground
Yellow - SRV Pin #3 (yellow)
White - Fuel injector ground wire (brown/dark blue)on cylinder #8 with green rubber water seal (forward most wire on injector connector)
Red - Relay Pin 87 (yellow)
30/40Amp relay
85 (black) - Ground
86 (white) - Micro2 Tap-a-fuse 12V+ switched accessory (fused 10A) - Fuse #76 ESP
30 (red) - 12V+ constant battery (fused 30A)
87 (blue) - SRV pin #1 (blue) 12V+ switched power (fused 10A)
87 (yellow) - MSD (red) 12V+ switched power (fused 10A) *Note: re-soldered yellow wire from pin 87a to 87 for (2) switched power outputs
Wiring and associated components:
![Image]()
![Image]()
![Image]()
![Image]()
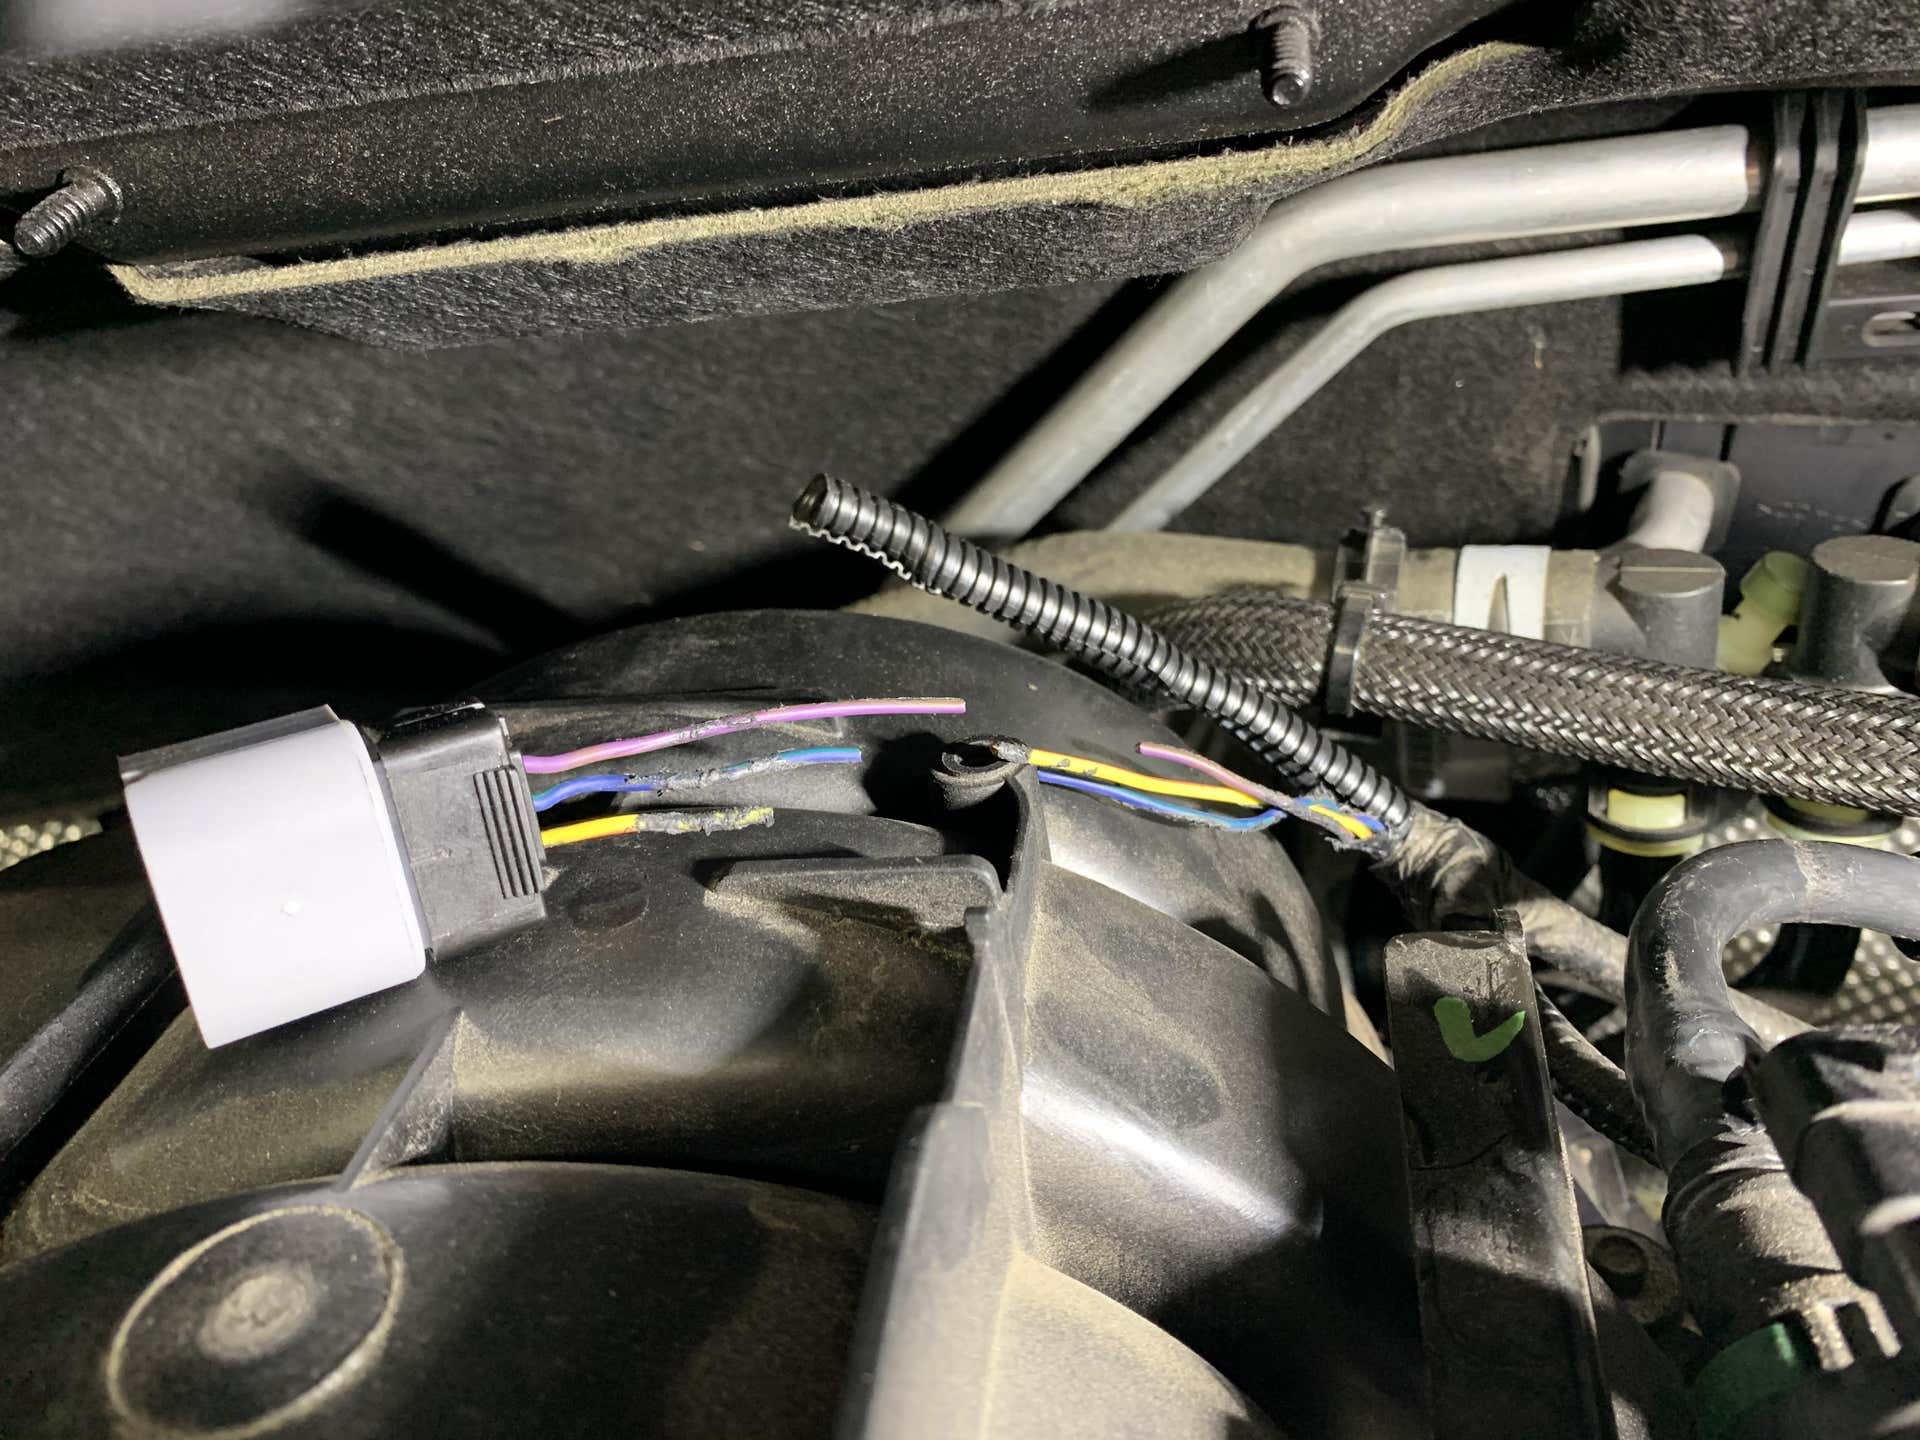
SRV (short runner valve) pigtail
![Image]()
![Image]()
TPS (Throttle Position Sensor)
![Image]()
![Image]()
![Image]()
![Image]()
![Image]()
MAP sensor
![Image]()
![Image]()
IAT sensor
![Image]()
![Image]()
Sent from my iPhone using Tapatalk I
I did not do the complete install at one time. This actually took me a couple weeks as I was waiting for parts and did a lot of the wiring before I even swapped the intake manifolds. I would say I have a total of about 15 working hours. You could probably slap this on and have everything wired in 3-4 hours and functional but I took my time and made it look as factory as possible. I did more than the average person would based on personal preference (aka my OCD) which you will see in the pictures. Enjoy!
Parts needed:
•6.4L/392 intake manifold from any Dodge/Jeep/Chrysler SRT vehicle
•Short runner valve (SRV) actuator (05038529AC)
•Short runner valve (SRV) wiring pigtail (68064996AA)
•MAP sensor (68271094AB)
•PCV Valve Cap (05038532AA) *5.7L will not fit correctly
•MSD 8969 digital RPM window switch
•Painless Performance 70213 Cirkit Boss or 30/40 AMP waterproof relay
•In-line waterproof fuse holders (3) if using the 30/40 AMP relay
•Micro2 tap-a-fuse
•Air intake (OEM or aftermarket for 6.4L Durango SRT) or modify current intake
•20 gauge colored primary wire
•16 gauge colored primary wire
•Split wire loom (1/8”, 1/4”, 3/8”, 1/2”)
•Tessa tape (high heat exterior)
•Super 33+ electrical tape
•Adhesive lined heat shrink tubing
•Zip ties
•Soldering iron
•Ring terminal electrical connector
•3/8” fuel line quick disconnect tool
•Blue threadlocker
Optional:
•6.4L/392 engine half covers (05281359AA & 052813358AA)
•New intake manifold gaskets (Mahle MS19825)
•New throttle body gasket (Mahle G32511)
Swappable parts from the 5.7L:
•PCV breather hoses
•Throttle body (*I upgraded to a BBK 85mm p/n 1842)
•Brake booster vacuum hose
•Fuel rail and fuel injectors
•Oil filler cap
Wiring Extensions:
•MAP sensor (8”)
•IAT sensor (4”)
•TPS (16”)
Wiring Connections:
SRV connector clip (p/n 68064996AA) facing up L to R from the rear (1-2-3-4)
Pin #1 (blue) - Pin 87 on relay (blue)
Pin #2 (black) - Ground
Pin #3 (yellow) - MSD yellow
Pin #4 - Not used
MSD Box (settings: mode=1, on=4,400rpm-4,800rpm off=8,000rpm)
Gray - Not used
Black - Ground
Yellow - SRV Pin #3 (yellow)
White - Fuel injector ground wire (brown/dark blue)on cylinder #8 with green rubber water seal (forward most wire on injector connector)
Red - Relay Pin 87 (yellow)
30/40Amp relay
85 (black) - Ground
86 (white) - Micro2 Tap-a-fuse 12V+ switched accessory (fused 10A) - Fuse #76 ESP
30 (red) - 12V+ constant battery (fused 30A)
87 (blue) - SRV pin #1 (blue) 12V+ switched power (fused 10A)
87 (yellow) - MSD (red) 12V+ switched power (fused 10A) *Note: re-soldered yellow wire from pin 87a to 87 for (2) switched power outputs
Wiring and associated components:

SRV (short runner valve) pigtail


TPS (Throttle Position Sensor)


MAP sensor
IAT sensor


Sent from my iPhone using Tapatalk I


 in 7) 16 gauge 20A inline fuse


