Dodge Durango Forum banner

4.7 timing chain replacement

96K views 40 replies 13 participants last post by  Ssneed8269  
#1 ·
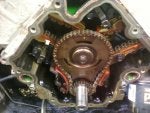
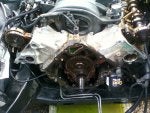
I'm starting the tear down to replace the timing chain on my 01 D 4.7 engine and went to Advance to get a loaner tool to remove the clutch fan. Well, none of them fit, it's one of those universal kits that doesn't work! :wall: I called Autozone and it's the same kit Advance had. Is there another way to get the darn thing off without taking a BFH to it?? :lol: I don't want to spend $100 on one thru Miller and then be stuck with something I may never use again! I also tried a big crescent wrench, but it just keeps slipping. I don't want to use vise grips on it and they may not work anyway. Any ideas, please let me know. This will be my timing chain thread and I'll update it with pics.

thanks!
 

Attachments

#2 ·
From what I remember when I removed mine, I used a huge adjustable wrench on the fan nut and put a screwdriver through the hole on the water pump belt part to stop it from spinning. It's been a few years, but I'm fairly certain that, and a lot of swearing, was all I used to take it off when replacing my water pump.
 
#6 ·
It's normal thread.
Put a BFAW (Big Fraking Adjustable Wrench) on it and whack it with a BFH (you know what that is) and it'll come right off.
Steve
PS I have a brand new Dodge clutch fan in stock! LOL
 
#9 ·
(advance to 2:30)

I'm too frightened to try that, but it looks easy enough.

I had a 15" crescent adjustable wrench I used when I took the fan off my Jeep, I think it was like $30 at one of the local stores. Definitely wedge something in there to keep it from spinning.

Good luck!
 
#10 ·
As a professional, the faster it's done, the more money you make! And yes, that would work quite well. For the rest of us, put a couple of bolts into the holes in the pulley where the bolts used to go to hold it to the water pump and stick a bar in between them to hold the pulley if necessary.
 
#12 ·
WhiteD said:
Check this trick out (advance to 2:30)

I'm too frightened to try that, but it looks easy enough.

I had a 15" crescent adjustable wrench I used when I took the fan off my Jeep, I think it was like $30 at one of the local stores. Definitely wedge something in there to keep it from spinning.

Good luck!
That's the way I've always taken them off.
 
#13 ·
Finally got it off, thanks guys! :clap: I checked the other side of the chain and it has some slack in it as well, but the heads are really clean inside, NO SLUDGE! Man, that drivers side valve cover is a PITA to get off!! The only thing I have to do now's get it at Top Dead Center. So, what's the easiest way to do that? If I align the harmonic balancer up with the line on the timing cover, will it be at TDC? To remove the balancer, do I use the 3 jaw puller? Then I have to remove the cover, VERY TIME CONSUMING!

Couple of more pics.
 

Attachments

#14 ·
As far as the balancer, I don't remember if it's a keyed pulley or pressed on?? If it's keyed, a standard 3 jaw puller will work fine, even using 2 pry bars will work. If it's pressed on, you'll need a special 3 jaw puller that has a rod that goes into the crank after you remove the center bolt and locks onto the puller so you can remove it.

As far as the timing marks, I take the front cover off and put the crank bolt back in. The chains should have timing marks on them and I just line all the marks up and then take the chains and guides off.
 
#16 ·
There really aren't any timing marks on the motor itself. If you look at the new chains, you should have a link that's a different color (usually gold) while the rest are silver. The left and right chain will have a single link like this (if it was the center chain, it'd have 1 single and 1 double link.) Each sprocket will have a dot on it and you line the links up with the dots to set the timing. The double link goes on the top center sprocket while the single one goes on the crank sprocket and should almost be facing down toward the ground. The cam sprockets go on at like 1:30 to 2:00 o'clock position. It's actually very easy to set up, but hard to explain!

EDIT
Oops, never noticed it before, but yes there's TDC marks on the timing cover and the crank pulley.

Don't know if you have this or if it'd help at all but?

Using a vise, lightly compress the secondary chain tensioner piston until the piston step is flush with the tensioner body. Using a pin or suitable tool, release the ratchet pawl by pulling it back against the spring force through the access hole on the side of the tensioner. While continuing to hold the pawl back, push the ratchet device to approximately 2 mm from the tensioner body. Install the special tool 8514 lock pin into the hole on the front of the tensioner and slowly open the vise to transfer piston spring force to the lock pin.

Position the primary chain tensioner over the oil pump and insert bolts into the lower two holes on the tensioner bracket and tighten them to 28 N-m (250 in-lbs.) CAUTION: overtightening the bolts can cause severe damage to the cylinder head so only tighten them to the specified torque!

Install the right side chain tensioner arm, apply Mopar Lock N Seal to the torx bolt and tighten it to 17 N-m (150 in-lbs.) NOTE: the silver bolts retain the guides to the cylinder heads and the black bolts retain the guides to the engine block.

Install the left side chain guide and tighten the bolts to 28 N-m (250 in-lbs.) CAUTION: overtightening the bolts can cause severe damage to the cylinder head so only tighten them to the specified torque!

Install left side chain tensioner arm, apply Mopar Lock N Seal to the torx bolt and tighten it to 17 N-m (150 in-lbs.) CAUTION: overtightening the bolt can cause severe damage to the cylinder head so only tighten it to the specified torque!

Install the right side chain guide and tighten the bolts to 28 N-m (250 in-lbs.) CAUTION: overtightening the bolts can cause severe damage to the cylinder head so only tighten them to the specified torque!

Install both secondary chains onto the idler sprockets and align the two plated links on the chains so they're visible through the two lower openings on the idler sprocket (4 o'clock and 8 o'clock.) Once the secondary timing chains are installed, position special tool 8515 to hold the chains in place for installation.

Align the primary chain double plated link with the timing mark at 12 o'clock on the idler sprocket and align the primary chain single plated link with the timing mark at 6 o'clock on the crankshaft sprocket.

Lubricate the idler shaft and bushings with clean engine oil.

Install all chains, crankshaft sprockets, and idler sprockets as an assembly.

After guiding both secondary chains through the block and cylinder head openings, affix them in place with an elastic strap or equivalent to maintain tension on the chains and aid in installation. NOTE: It'll be necessary to slightly rotate the camshafts for sprocket installation.

Align the left camshaft sprocket ?L? dot to the plated link on the chain.

Align the right camshaft sprocket ?R? dot to the plated link on the chain.

Remove special tool 8515 and attach both sprockets to the camshafts. Remove excess oil from the bolts and install them but don't tighten at this time. CAUTION: failure to remove excess oil from the bolts can allow in over-torquing of the bolts resulting in bolt failure.

Verify all the plated links are aligned with the marks on all sprockets and the ?V8? marks on the camshaft sprockets are at the 12 o'clock position. CAUTION: ensure the plate between the left secondary chain tensioner and block is correctly installed.

Install both secondary chain tensioners and tighten the bolts to 28 N-m (250 in-lbs.) NOTE: the left and right secondary chain tensioners aren't interchangeable!

Before installing the idler sprocket bolt, lubricate the washer with oil. Then tighten the idler sprocket assembly retaining bolt to 34 N-m (25 ft-lbs.)

Remove all the locking pins (3) from the tensioners. CAUTION: after pulling the locking pins out, DO NOT manually extend the tensioner ratchets. Doing so will over tension the chains resulting in noise and/or high timing chain loads.

Using special tool 6958 spanner with adaptor pins 8346, tighten the left and right camshaft sprocket bolts to 122 N-m (90 ft-lbs.)

Rotate the engine two full revolutions and verify the timing marks are at the follow locations:
  • Primary chain idler sprocket dot is at 12 o'clock.
    Primary chain crankshaft sprocket dot is at 6 o'clock.
    Secondary chain camshaft sprockets ?V8? marks are at 12 o'clock.
Lubricate all three chains with engine oil.

After installing all the chains, idler gear end play should be checked. End play must be within 0.10?0.25 mm (0.004?0.010 in.) If not within specification, replace the idler gear.

Install the timing chain cover (Refer to section 9 - Engine/Valve Timing/Timing Belt/Chain Covers Installation) and the crankshaft damper (Refer to section 9 - Engine/Engine Block/Vibration Damper Installation.)

Install the cylinder head covers (Refer to section 9 - Engine/Cylinder Head/Cylinder Head Covers Installation.)

Coat the large threaded access plug with Mopar Thread Sealant with Teflon and then install it into the right cylinder head and tighten to 81 N-m (60 ft-lbs.) [b[NOTE:[/b] the threaded plug must be coated with sealant to prevent leaks.

Install the oil fill housing.

Install the access plug in left cylinder head (Cylinder Head Access Plug Location).

Install the power steering pump (Refer to section 19 - Steering/Pump Installation.)

Install the radiator fan shroud.

Fill the cooling system (Refer to section 7 - Cooling Standard Procedure)

Reconnect the battery.
 
#41 ·
There really aren't any timing marks on the motor itself. If you look at the new chains, you should have a link that's a different color (usually gold) while the rest are silver. The left and right chain will have a single link like this (if it was the center chain, it'd have 1 single and 1 double link.) Each sprocket will have a dot on it and you line the links up with the dots to set the timing. The double link goes on the top center sprocket while the single one goes on the crank sprocket and should almost be facing down toward the ground. The cam sprockets go on at like 1:30 to 2:00 o'clock position. It's actually very easy to set up, but hard to explain!

EDIT
Oops, never noticed it before, but yes there's TDC marks on the timing cover and the crank pulley.

Don't know if you have this or if it'd help at all but?

Using a vise, lightly compress the secondary chain tensioner piston until the piston step is flush with the tensioner body. Using a pin or suitable tool, release the ratchet pawl by pulling it back against the spring force through the access hole on the side of the tensioner. While continuing to hold the pawl back, push the ratchet device to approximately 2 mm from the tensioner body. Install the special tool 8514 lock pin into the hole on the front of the tensioner and slowly open the vise to transfer piston spring force to the lock pin.

Position the primary chain tensioner over the oil pump and insert bolts into the lower two holes on the tensioner bracket and tighten them to 28 N-m (250 in-lbs.) CAUTION: overtightening the bolts can cause severe damage to the cylinder head so only tighten them to the specified torque!

Install the right side chain tensioner arm, apply Mopar Lock N Seal to the torx bolt and tighten it to 17 N-m (150 in-lbs.) NOTE: the silver bolts retain the guides to the cylinder heads and the black bolts retain the guides to the engine block.

Install the left side chain guide and tighten the bolts to 28 N-m (250 in-lbs.) CAUTION: overtightening the bolts can cause severe damage to the cylinder head so only tighten them to the specified torque!

Install left side chain tensioner arm, apply Mopar Lock N Seal to the torx bolt and tighten it to 17 N-m (150 in-lbs.) CAUTION: overtightening the bolt can cause severe damage to the cylinder head so only tighten it to the specified torque!

Install the right side chain guide and tighten the bolts to 28 N-m (250 in-lbs.) CAUTION: overtightening the bolts can cause severe damage to the cylinder head so only tighten them to the specified torque!

Install both secondary chains onto the idler sprockets and align the two plated links on the chains so they're visible through the two lower openings on the idler sprocket (4 o'clock and 8 o'clock.) Once the secondary timing chains are installed, position special tool 8515 to hold the chains in place for installation.

Align the primary chain double plated link with the timing mark at 12 o'clock on the idler sprocket and align the primary chain single plated link with the timing mark at 6 o'clock on the crankshaft sprocket.

Lubricate the idler shaft and bushings with clean engine oil.

Install all chains, crankshaft sprockets, and idler sprockets as an assembly.

After guiding both secondary chains through the block and cylinder head openings, affix them in place with an elastic strap or equivalent to maintain tension on the chains and aid in installation. NOTE: It'll be necessary to slightly rotate the camshafts for sprocket installation.

Align the left camshaft sprocket ?L? dot to the plated link on the chain.

Align the right camshaft sprocket ?R? dot to the plated link on the chain.

Remove special tool 8515 and attach both sprockets to the camshafts. Remove excess oil from the bolts and install them but don't tighten at this time. CAUTION: failure to remove excess oil from the bolts can allow in over-torquing of the bolts resulting in bolt failure.

Verify all the plated links are aligned with the marks on all sprockets and the ?V8? marks on the camshaft sprockets are at the 12 o'clock position. CAUTION: ensure the plate between the left secondary chain tensioner and block is correctly installed.

Install both secondary chain tensioners and tighten the bolts to 28 N-m (250 in-lbs.) NOTE: the left and right secondary chain tensioners aren't interchangeable!

Before installing the idler sprocket bolt, lubricate the washer with oil. Then tighten the idler sprocket assembly retaining bolt to 34 N-m (25 ft-lbs.)

Remove all the locking pins (3) from the tensioners. CAUTION: after pulling the locking pins out, DO NOT manually extend the tensioner ratchets. Doing so will over tension the chains resulting in noise and/or high timing chain loads.

Using special tool 6958 spanner with adaptor pins 8346, tighten the left and right camshaft sprocket bolts to 122 N-m (90 ft-lbs.)

Rotate the engine two full revolutions and verify the timing marks are at the follow locations:
  • Primary chain idler sprocket dot is at 12 o'clock.
    Primary chain crankshaft sprocket dot is at 6 o'clock.
    Secondary chain camshaft sprockets ?V8? marks are at 12 o'clock.
Lubricate all three chains with engine oil.

After installing all the chains, idler gear end play should be checked. End play must be within 0.10?0.25 mm (0.004?0.010 in.) If not within specification, replace the idler gear.

Install the timing chain cover (Refer to section 9 - Engine/Valve Timing/Timing Belt/Chain Covers Installation) and the crankshaft damper (Refer to section 9 - Engine/Engine Block/Vibration Damper Installation.)

Install the cylinder head covers (Refer to section 9 - Engine/Cylinder Head/Cylinder Head Covers Installation.)

Coat the large threaded access plug with Mopar Thread Sealant with Teflon and then install it into the right cylinder head and tighten to 81 N-m (60 ft-lbs.) [b[NOTE:[/b] the threaded plug must be coated with sealant to prevent leaks.

Install the oil fill housing.

Install the access plug in left cylinder head (Cylinder Head Access Plug Location).

Install the power steering pump (Refer to section 19 - Steering/Pump Installation.)

Install the radiator fan shroud.

Fill the cooling system (Refer to section 7 - Cooling Standard Procedure)

Reconnect the battery.
I don't have any marked links on my chain how many links us it between the double marked link and the single marked link on the left and right side?
 
#17 ·
Thanks Dakattack, I had some of that info but it really helps! I wonder if there's a easier way to find TDC as I don't see how it'll stay at TDC while you're loosing everything up? Maybe I'm missing something. :?

Lining up the timing marks, cams V8 marks at 12 o'clock. More pics. :cheesy: just trying to find the tools I need for the job. I checked KB tools and Harbor Freight. if someone knows of a cheaper place than Miller, please let me know?

I need:
  • 8512 crankshaft damper removal insert
    1026 puller (looks like a 3 jaw)
    8512 damper installer
    8514 chain tensioner pins
    8515 secondary chain holder
    6958 spanner wrench with adapter pins 8346
    8348 front crankshaft seal installer
    8515 front crankshaft seal remover
 

Attachments

#18 ·
I'm gathering the parts for the timing chain job and for those looking to get a full replacement timing set for the 00-01 4.7's, it's not available from Cloyes (part # 9-0393S has been on backorder since Jan!) something about not being able to get all the gears for the kit?? I have a question. 9-0393SX, the complete timing kit minus the gears, is available. do you think I'll be able to reuse the gears? I'll be putting new tensioners, guides, and chains on it. please let me know. thanks
 
#19 ·
Isn't one of the cam tools a wedge that locks the cam in place? The crank isn't going to move, you just have to hold the cams in position. If the plugs are left in the engine, it won't move too easily by itself due to compression but you'd have to use the starter to bump the engine over to TDC using the remote starter switch.
 
#21 ·
Personally, I'd replace them just to be safe. Bad gears can hurt a good chain.
 
#23 ·
More progress? slow progress that is! :lol: I finally got the cover off after breaking 2-3 jaw pullers! :cheesy: I made a
, it can be pushed down with one finger and hardly has any tension on it! The driver's side was pretty tight and I couldn't push up on it.

More pics to come.
 

Attachments

#24 ·
:wall: :wall: :wall: :furious: I started on pulling the chains and first undid all the guides, low and behold, the %$^& passenger side cam spun a little so it's no longer at 12 o'clock, it's more like 3 o'clock! Arrrgghhh!! I didn't realize they were under that much tension that they'd spin. is this easy to correct? since it's all coming off anyway, can I just turn it back to 12? Any help appreciated!
 
#26 ·
Oh OK, so do I just rotate it back to 12 when I get all the chains set?

I had emailed a guy called Nick, he runs airrampeformance.com, and this is what he told me to do.

Nick said:
Not a problem. Your sprockets are timed to the chains so you just turn the cam to align the key to the sprocket key hole which, since the sprocket should already be aligned to the chain, it's the cam that needs to be turned and aligned to the sprocket.

For me this is the easiest way to do the chains & sprockets on the 4.7L.

Needed - bag of 4" Zip ties
Large piece of CLEAN cardboard box laid out on the ground.

Lay the sprockets on the cardboard as they'd sit in the engine
Align your chains to the sprockets making sure your timing marks are all lined up.
Zip tie the sprockets to the chain in a manner that'll hold the chains to the sprockets and secure the timing marks in place BUT allow you to mount to the engine without removing them. Verify timing marks are lined up.
Lock each chain to the sprockets with the zip ties and double check your timing marks are still aligned.
Pick up the assemble by the two cam sprockets and gently mount the idle sprocket & crank sprockets and turn the crank to align to the sprocket.
Now run the cam sprockets up into the head and line the cams keys to the sprocket.
Insure the guides and tensioners are mounted and torqued.
Pull the tensoner pin.
Triple check and verify all the timing marks are lined up.
Verify the cam keys are in the cam sprockets and then torque the cam bolts.
Remove all the zip ties.
Verify all the work.

Remember, timing is EVERYTHING. You must insure once the chain marks are lined up with the sprockets that they NEVER lose that relationship throughout the install procedure.

If you have any additional questions, please feel free to contact me.

Nick D'Ambrosia
www.AIRRAM.com
817-800-7760
Just thought I'd share because someone else will probably have to do this one sooner or later! :)