Dodge Durango Forum banner

2001 Durango R/T frame off restore

119K views 360 replies 24 participants last post by  repoman  
#1 · (Edited)
2001 Durango R/T frame on restore

Hello:
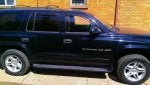
Noob to the group. I am about to complete a frame off restore of a 2001 Durango R/T "Black Beast".
. I purchased ( also known as got ripped off) this for $3500. Since the moment I hit the highway with it, I have been fixing problems with it. First I could not steer without 2.5" of play!. Yes that is right I could not begin to steer with out turning the wheel 2.5". If you know Durangos, then you know this was an easy fix. So the first thing done was replacing the intermediate shaft.

After completing the steering fix, I moved to the brakes. The kid I bought it from said "I think you need to put another disc clip" on. Well this is what I found:
Somehow the disc brake clips are on the calipers incorrectly, the rivet touching the hat on the rotor
, which subsequently caused the rivet to gouge a 3mm annular groove around the rotor hat. This increased pressured pulled down the brake pads so hard on the steering knuckles that his happened:
You can see in the circled part how the pads have grooved so deeply into the knuckles that the pad have dropped into and pulled through this gap. Now the pads are stuck at the top and float down to the center of the rotor. As each time the brakes are applied it effectively brakes less!. Notice on the rotor how the shiny part is at the bottom. The top is locked into those grooves on the steering knuckles. A couple of hot heat cycles in the city and these babies are ready to turn into exploding brakes. No thanks.
This is pretty much where my stomach starts turning. The whole underside of the car, dirt road queen.​
Surface rust from sand with that nice red rusty top coat from salt! My favorites:

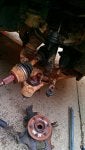
First one is a ball joint ready to snap, notice the rusty colored salts on rock chipped paint. Every dirt road queen in Michigan has it. Second one bad hub, bad half shaft, tie .... just fix it all. Third one is a shot of the grooves in the steering knuckles. Fourth one tie rod that came off easy. completely different size from the other side.


I've got lots more to the story so far. I'll update this as I move along.
 
#110 ·
Steering gear complete and installed


Came out looking pretty good. Installed. Not torqued yet. Have to pull it again in order to get motor mount installed. left motor mount bolt needs to be in . One of the 'TANGS' on the top of the steering gear prevents the left motor mount from coming fully out. Painful, but cool feature.
 
#111 ·
Calipers primed, motor mounts going metallic blue


Okay I have decided on some color scheme. I like this blue that is on my 99 Durango. I can mimic the effect with metallic candy paint. Looks pretty good.

Here you can see I have the hi-temp paint on the calipers. The boots were torn so I will have to rebuild them. They use Phenolic pistons. Believe me don't try and use pliers or channel locks to get them out. Use a piece of wood to catch the piston . Press out with air slowly, don't burst out. Use a piston compression tool to hold one piston barely in, while moving the other piston out with air. ( wood to catch in case you go to all the out. )

I have always purchased lifetime parts. In this case the upper tie rods that I put in 4/27/15 were borked already. I returned them cause I save all my receipts.

I have started to assemble the steering knuckles to the arms. I have to have a whole front end torquing session.
  1. Finish front end
  2. Get wheels back on
  3. Work on axle prep/clean/paint
  4. Move on to prepping the engine.

Making progress. Little steps each night. All while working 60+ hours in two jobs. Woot.

Almost ready to work on the engine.
 
#112 ·
Motor mounts Part 2 . Advice needed on axle remove from cv joint.


one engine mount in, You have to put the motor mount in first, then the steering gear. First pix are second motor mount and Ol' Blue in the background. Can't finish the front end now, cause I need to put the axle back in. except I can't get the shaft from the front diff off of the bad half shaft> I have heated it, soaked in penetrating oil, hit it with sledge. Nothing. Any ideas? Anyone Bueller?
 
#117 ·
Pig in a blanket


New Seals. Want to publicly shame the local repair shop that said that the seals on a 2003 8.25" 205MM axle are "different" and can only come from a dealer. $8 each. both the same. notice the redesign without the stupid o-ring. Who thought that was a good idea?


Pig is hanging in a blanket.

Will be:
Baking the calipers @200*F for 1 hour in old BBQ grill.
Traveling to SStubes.com in Ohio next week to meet the staff and get all my lines.

excited! Almost to working on the engine.
 
#119 ·
Multiple updates: First topic SStubes.com

First on the list.

I made a trip to Wadsworth Ohio to visit FineLines http://www.sstubes.com. Had a great visit with Jeremy, Fred and the President Bob. Here are some shots
tube bending machine
End selection and capping table.

Here is a Youyube video of the bending , machine in action.

As part of my deal with them I will be assisting and asking for assistance identifing as many front and rear steel line variations as possible. They have run into so many variations that it's been a nightmare, (which I fully understand after talking to Bob) for them to the point they have pulled the line (insert pun) down. I will start another thread asking for specific pictures where possible and filling in by going to used car lots and junk yards. I'll chart out the pictures confirmations needed in that thread probably tomorrow.
 
#120 ·
Dual Piston Durango Caliper rebuild procedure

Get everything ready, gloves , fresh brake fluid, caliper, seals, pistons
Put scraper rubber ring into caliper body on both sides. Make sure to soak in brake fluid first. Then pull gasket seal down over piston until it slips into the annular groove. Make sure this is even all the way around. Test by scrunching the seal flat with top of piston.
Carefully seat piston EVENLY into caliper housing. Piston was well lubricated with brake fluid. Use Brake caliper tool to evenly press piston past scraper o-ring inside piston. Continue down until just before outside seal makes contact with caliper housing. Use Large round socket, or 4x4 ball joint press ring ( 3.75" iirc) to press seal into caliper housing. In the end with it lubricated I was able to work it down in with just my fingers.
This is about where I stopped before installation. You will have to press these until they bottom out to get them over new rotors and new pads. Just do it now. Be careful to sense when it's bottomed out and don't ever over press it down. They can stick ( well pretty hard with these being phenolic pistons, old metal kind would rust and stick on first pad change).
Calipers assembled.
 
#121 ·
2003 Durango Dual Piston Caliper Brake pad install procedure


Have everything ready on clear area. slide out board pad onto slides and move to outside of bracket

insert one side of caliper housing into slides

Make sure other side is in and square. It sits near center of caliper
seated on other side, near center
Align caliper pin holes
like so...
slide pad into gap between bracker and caliper

Even up pad to flush with end of caliper. Install caliper pins. Install caliper. Bleeder should always be towards the front and on the inside ( near engine) on both sides.
 
#122 ·
Front end complete with heartbreaks :[


Well I got the whole front end done, torqued and ready for brake lines. However I found that both of the lower ball joints that I installed are ruined. I pinched both sides of their boots and borked them. Anybody know if I can just get a boot for a ball joint? I haven't even gone 1 mile. ( bought these moogs on ebay. no chance the guy will send me new ones. ) Buy the lower ball joint installation and extraction tools. It's friggin worth it. I will be soon.
 
#123 ·
Franken-rango now with more Franken-r3p0 DNA

With much vim and vigor I began clearing the donor motor of ...crap. Started with the heatshield. Ended up with 7 stitches. That crap is sharp! This has kep me from being able to do updates. Sure has slowed me down.

Then I was so excited to finally have a set of headers. Until I looked at the fubar welds. Weld material closing up the header ports, not well die ground, not filled or over filled and not ground down. Horrible. Even a monkey like me could tig weld better.
I looked on line and notice that outside of the flange it's only being welded on the top and bottom. I had one tube welded all the way around. Inside the tubes is horrible. These ain't gonna flow bro.

Any advice peeps?


#124 ·
Whose headers are those? That is horrible!
 
#125 ·
EBay Somthing called Eworld out of Troy MI. If I had to guess they are knock offs made in china and sent to US. Like I said to the seller, these won't flow bro. The offered me 50% of the money back $85 for me to keep them ( so they won't get a bad rep on ebay ) yeah right. lowering the price won't fix the shoddy workmanship.
 
#126 ·
Here's the scoop on the 5.9L headers. Mike Leach secured a contract to produce them for Mopar Performance. He also sold the same header under the PPH name in Gen 1 and Gen 1.5 configs. Word on the street is that Doug Thorley bought the design, however there are none in production, and to my knowledge, none in stock anywhere. I do remember in 08 someone tried to get a group buy on Gen 1 PPH (the last 8 sets) on Dak-Dur. It fizzled. 3 or 4 some bought Gen 1 headers for their Gen 1.5. (The difference being the Y pipe.)

The Y isn't that big of a deal… any idiot muffler guy can make those.

I'd keep my eyes peeled for used ones on all dodge forums, and post a WTB. They are heavy steel and most got ceramic coated, so they should be good to go even used.

OR

Go with a shorty and cuss every time you need to change a plug. LOL

OR

Contract a fabricator to make some. Hot rod shops make custom ones all the time. :)
 
#128 ·
Gimped Hand update


Being on the DA list for now the 3rd week has totally hindered me.
working 7 days has really challenged me to keep the finger dry and stop banging things on it. I had the stitches taken out way too early. Had to resort to steri-strips and Tegraderm to hold it shut. Lost so much time.
I did get the wheels on. I just got the last brake hoses , so now I can finish the brakes and move fully to the engine. I will be candy coating the intake manifold blue like the rest of the aluminum stuff. I am having a sand blaster clean up the accessory bracket for me. Alot quicker and cheaper. Especially when I am gimped. ( yes it needs an alignment).
 

Attachments

#129 · (Edited)
Off the DA list update

So those of you that are follow know that I took 7 stitches from the heat shield on my exhaust manifold during its removal from the 5.9L donor motor. I'm happy to say that after almost 3 full weeks of rest and doing nothing but playing a game online, I am back in full swing. So here goes a couple of posts to bring this thread up to date.

I've moved the Black Beast outside, as shown in an earlier post. I have moved the whole garage around into a make shift engine shop
.
and started the derusting of the engine as shown here

.
 

Attachments

#130 ·
Engine debrieding continues

Lots of engine reference pictures, and some tables for taken down organization. It's an 'operation'.
Before
After
Moving to get timing cover off. Needed to check timing chain, since this was near the site of impact in accident. Notice proper FCA puller in use on harmonic balancer. I rented this from Advance Auto parts store. $119, including the install set as well.
 
#131 · (Edited)
Bracketry and powdercoating

So I started dissasembling the motor to get all the aluminum parts removed that were left ( power steering mount, special tool needed) , the timing chain cover and the accessory bracket for alternator and air conditioning compressor. I tried to clean the accessory bracket, however my finger was not quite strong enough to be able to hold the angle grinder with the wire brush on it. So I looked for the nearest sandblasting shop that wanted my business. I ended up with Martin Powder Coating - We can make it look NEW again!, about 15 miles from my location. This is a professionally run powdercoating business.
I had them sandblast the accessory bracket for me. Here is the end result.


As you can see kinda dull. I few days later I was able to wire brush it and paint it with the blue metallic candy I had been putting on all the other aluminum parts.

We'll needless to say I did not like the out come. So I decided to have them powdercoat the Hughs Engine FI intake that I purchased and the accessory bracket re-sandblasted and blue candy coated. I'm waiting on these results now. Once I have them, I will decide if I want a clear on top of that and or if I will have the last two parts done as well. Trying to keep the color schema same through the truck without being guady or cheap looking ala Red Green .

 
#132 ·
Timing chain loose?

Looking for some advice here. I have read many forums posts on as many sites as possible about timing chain looseness. I have been concerned because the brunt of the forces of the impact to the donor vehicle were at or near the timing chain location. Here are some shots of the timing chain. It seems WAAAAAAAAAAAAAAAAAAAAY loose to me. I don't see how there is any tensioning anything on it or behind it.

In addition I got the gasket install kit and it had a "sleeve" in it, I can't find anything about anywhere. I have posted a separate thread on help with what this is, where is goes and any installation tips.

i'm looking at getting a timing belt tensioner from Mancini racing Timing Chain Tensioner
 
#133 ·
The chain will not be tight on a used engine. Do NOT use a tensioner.

Here is the procedure for measuring timing chain slack (which is normal over time) to determine if it's stretched beyond spec.

1. Put a straight edge from the crank gear to the cam gear and measure the amount of slack at the mid point of the chain. 1/2" is the limit.

2. In the FSM it directs you to turn the cam back and forth with out moving the crank and pick a point at the top of the cam gear and measure the motion. The limit is 1/8" play.

Rule of thumb: If an engine is on the engine stand, replace the chain. I prefer double rollers for longevity, but tut's just me. ;)
 
#134 ·
I'll go check all these measurements and RTFM that. I guess I missed that in the manual. Must be in the engine building section.
Just by moving it by hand, I swear it's almost 3/4" on one side. I moved it back and forth to the median tension of chain on boths sides. I felt this was greatere than 1/8" play. Both "seemed" out of spec without measuring. I will be checking that in a minute.

I already have a new double roller chain. :]
 
#135 ·
#137 ·
Yes. Do it right, do it once. Besides it is easy.