Dodge Durango Forum banner
1 - 20 of 54 Posts

Duh-rango

· Registered
2017 AWD durango GT 3.6
Joined
·
2,758 Posts
Discussion starter · #1 · (Edited)
Update: To spare folks reading the entire thread, the problem was the high lift lobe on cyl #5 was wiped.

Over the weekend I was accelerating off the line hard with my 2017 DDGT and noticed a rattle/light rapid knocking. I thought it was rod knock but to me it seems like maybe valvetrain related. I have 96kmiles, no codes, oil pressure and oil is good (even changed it again and checked filter for signs of metal debris...all good) and it seems the rattle only occurs on hard acceleration (maybe VVL related?).

When the engine is cold you can hear the rattle with easy but when warm it is harder to notice...or so I thought. Pulled into work this morning and rolled the window down to record the noise. In the vid I am in park and stab the gas (3000rpm limit...that is usually the transition point for oil pressure to jump to ~70psi) and you can hear the noise. I then put in reverse and then drive while holding the brake (unfortunately engine does not hit 3000rpm) and the noise seems to go away...although RPMs are lower. I then put it back in park and stab the gas one last time. At idle there is no tick or knock but need to get a stethoscope to confirm.

Engine runs fine but when you accelerate hard you get the noise as far as I can tell. This one definitely has me guessing but I am pretty confident it is not rods, maybe VVL or oil pump when it kicks into high pressure mode? What do you guys think?

 
Discussion starter · #2 · (Edited)
Well looked into it at the work parking lot during lunch, it is definitely sounding like maybe a rocker going bad. Time to pull the valve covers (about that time to change plugs and oil filter housing anyways). Always something.

That dieseling sounds similar to other rocker failures.


Don't thing I am going to repair this one, might just take it to the local dodge dealership to get it done. Will be the first time I have ever paid a dealership to do a repair. But if they come back with a $4k estimate I will definitely just do the repair myself.
 
Discussion starter · #4 ·
Just sounds like the infamous Dodge valve tick to me. Its been common since at least the 90s.

Edit: just watched some videos and it seems more likely that you already have some broken manifold bolts.
So I have some more vids where you can't hear anything wrong at idle and then all of the sudden there is a clacking followed by what seems like air rushing into the intake which turns out to be evap purge cycling.

What manifold bolts are you referring to...exhaust....intake?

I seriously think the VVL is what is tripping me up here, I took a stethoscope and touched around the heads and no obvious ticks/taps/knocks which seems to quiet down with a hot engine. About >3000rpm is where the noise seems to spontaneously kick in. Looks like the challenger will be my daily for now.
 
Discussion starter · #6 · (Edited)
BTW if anyone is looking for a vid showing how to take off the intake manifold on a +2016 engine, these vids are pretty clear.

Here are examples of a failed pre-2016 rocker/lifter.

This vid shows how VVL system works and how to replace the solenoids (+2016 3.6). The rockers are fairly complex.

Some more details on how VVL operates...actually the guy is chasing down a misfire due to bad solenoid (+2016 3.6).

And here is a vid on how to remove cams on non-VVL engines (pre-2016 3.6).

Still looking for a +2016 cam replacement vid, but here is a 2018 VVL being torn down with high lift lobe failure.
 
Discussion starter · #9 · (Edited)
So the more I listen to other pentastar ticks (have yet to find a vid on a +2016 model) I notice I don't have a tick but more of a rattle/knock/clack (wonder if the rockers on the +2016 make a clack instead of a tick) which is making me scratch my head. I took a stethoscope and listened all over the top of the engine and no tick or knock. However, if I listen right at the front timing cover I can hear a pretty pronounce mechanical clack. I left the durango home so I can do a cold start on it and listen for noises.

Did a cold start this afternoon and I swear this sounds more like a rod knock. It does not sound like it is coming from the top of the engine but deeper within. At this point I am wishing it is a bad rocker/lifter/cam as I am not looking forward to do an engine swap...but I am setup to do so. Anyways going to pull the manifold and valve covers when I get home today, might even cancel the dealership service as I called again and the guy on the phone does not should very knowledgeable. Dropped off the wife EV at the house during lunch and picked up Casper...the not so friendly, supercharged challenger. :D
 
From what i have read and seen over time, '15 was a bad year for the 3.6L as well as the 5.7L Both were allegedly updated for '16. From the videos, I did not hear anything too distressing, but something may be amiss. I'd like to think you are on the front end of some lifter/rocker arm issues. The 3.6L in a friends '15 Grand Cherokee had the top end rebuilt, as in lifters/rocker arms around 112k. The night they picked us up for dinner, I heard the telltale clicks/clacks and clued them in.

Another Durango owner here had the same repair on his '18 3.6L. Thankfully, his was still under warranty.

Don
 
Discussion starter · #11 ·
From what i have read and seen over time, '15 was a bad year for the 3.6L as well as the 5.7L Both were allegedly updated for '16. From the videos, I did not hear anything too distressing, but something may be amiss. I'd like to think you are on the front end of some lifter/rocker arm issues. The 3.6L in a friends '15 Grand Cherokee had the top end rebuilt, as in lifters/rocker arms around 112k. The night they picked us up for dinner, I heard the telltale clicks/clacks and clued them in.

Another Durango owner here had the same repair on his '18 3.6L. Thankfully, his was still under warranty.

Don
This is so weird, I don't hear the noise during acceleration and engine seems to have more low end torque as I really have to push on the brakes to keep it from moving. Basically came home and went to start the durango and as it fired up it sounded like a solenoid in the engine bay move something like a sliding plunger (if that makes sense) and the engine fired up with no weird noises? Took it around town and was mashing the throttle in sport mode past 3k rpm and I don't hear the pronounce rattle (not even during decel). Just took another vid and I still kinda hear the rattle but now when I drive and accelerate hard I do not? I am seriously thinking this is VVL related or oil pump and not rockers. I still plan on pulling the valve covers this weekend for piece of mind.

 
Discussion starter · #12 ·
Looking at the FCA workbook I starting to wonder if is it a bad phaser...but that would definitely throw codes which I am not seeing any using alfaobd, diagFCA and OBDwiz. I might subscribe to alldata again as the guy in one of the vids I posted earlier was showing it on his monitor and it has info I have never seen before about VVL (chilton FSM does not show it and neither does the FCA workbook).

Image
 
Discussion starter · #13 ·
Well the noise is back while driving. I was thinking about this more and on the +2016 3.6 there is actually 2 lobes and rollers (per valve) for low lift operation but I usually hear the noise at hard accel which is high lift operation where the center lobe comes in contacted with the oil activated pad on the rocker. So if the high lift is activated and the pad does not push out then the rocker follows the low lift lobes and roller. I am really starting to suspect this is not a cam/rocker issue but something else internal to the engine...like maybe the oil pump.

Once I pull off the valve covers I can confirm if the top end is fine and if it is my next step would be to take a closer look at the oil pump and see if there is anything there that can cause such a noise. I am half tempted to just get another 3.6 and swap it with my current one. Anyways I will report my findings ones I take a look at the top end.
 
I started reading this post and immediately wondered if you had thought of oil supply.
 
Discussion starter · #15 · (Edited)
I started reading this post and immediately wondered if you had thought of oil supply.
Yeah I was suspecting this might be more of an oil pump issue but I have logged oil pressure and it kicks into high pressure mode at 3000rpm like it is supposed to. I don't think it is a rod as it would get worse under load and if the inspection of the cam/rockers is all good then I only see oil supply being the issue.

That said, the noise reminds me of my old ramcharger where I parked it on a steep hill (engine facing uphill) and on startup I got a similar rattle that tracked with rpm. I turned out to be the torque convert as it sounded like it came from the bellhousing. Once I drove on a level road it went away and never happened again.
 
Discussion starter · #16 · (Edited)
Discussion starter · #17 ·
Well I got the driver side valve cover off and all lobes and rockers were good. I made sure to rotate the engine so cam lobes we not pushing on the rockers and all were good. Which confirms what the stethoscope was telling me as there was no discernable noise on that side.

Now I am stuck trying to get the passenger side valve cover off. The FSM gives no info on this an far as I can tell the EGR cooler must be moved out of the way which is a major PITA to do.

Anyone ever remove the valve cover off a +2016 3.6? I can't seem to find any vids showing this.
 
Discussion starter · #18 · (Edited)
Well after looking at the FSM to see if I can remove the spark plug tubes, I finally found out the EGR has to be moved. Good grief!

RIGHT
NOTE

The magnetic timing wheels must not come in contact with magnets (pickup tools, trays, ect.) or any other strong magnetic field. This will destroy the timing wheels ability to correctly relay camshaft position to the camshaft position sensor.
  1. Disconnect and isolate the negative battery cable.
  2. Remove the upper intake manifold (Refer to 09 - Engine/Manifolds/MANIFOLD, Intake/Removal) (Refer To List 1).
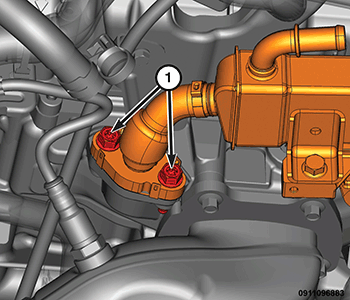
  3. Remove the Exhaust Gas Recirculation (EGR) cooler and position aside (Refer to Emissions Control/Exhaust Gas Recirculation/COOLER, Exhaust Gas Recirculation (EGR)/Removal) .
    NOTE
    It is not necessary to drain the cooling system or remove the cooling hoses from the EGR cooler. (Looks like you just need to be able to move to the right so the plastic foot from the valve cover clears the front EGR pipe.)
  4. Cover the open intake ports to prevent debris from entering the engine.
    Image
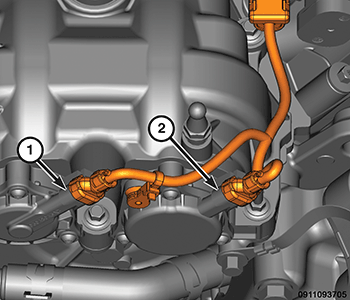
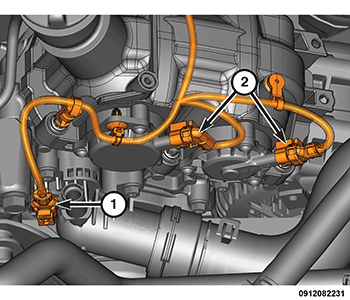
  5. Disconnect the wire harness connectors (1 and 2) from the variable valve timing solenoids on the right cylinder head cover.
    NOTE
    Mark the variable valve timing solenoid connectors with a paint pen or equivalent so that they may be reinstalled in their original locations.
  6. Disengage the wire harness retainers from the right cylinder head cover.
    Image
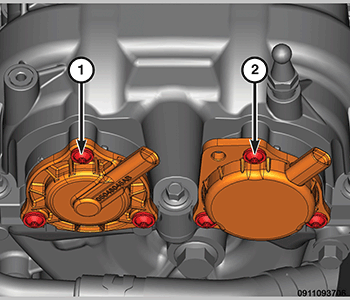
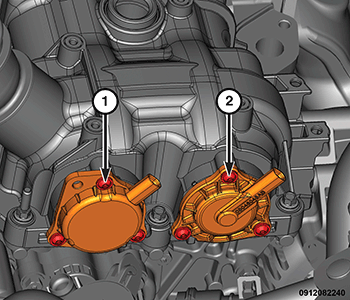
  7. Mark the variable valve timing solenoids (1 and 2) with a paint pen or equivalent so that they may be reinstalled in their original locations. (Probably best to perform a cam/crank relearn with alfaobd or HP tuners VCM scanner specialty function when you reinstall everything.)
  8. Remove the variable valve timing solenoids (Refer to 08 - Electrical/Ignition Control/SOLENOID, Variable Valve Timing/Removal) .
    Image
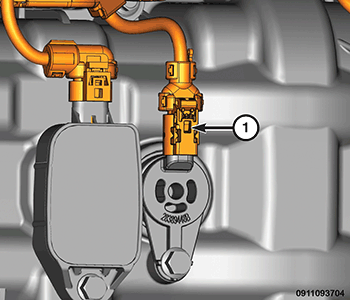
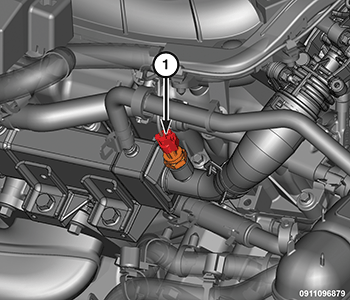
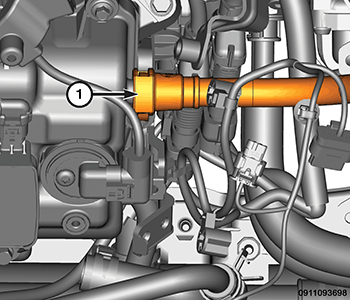
  9. Disconnect the Variable Valve Lift (VVL) solenoid wire harness connector (1).
    Image
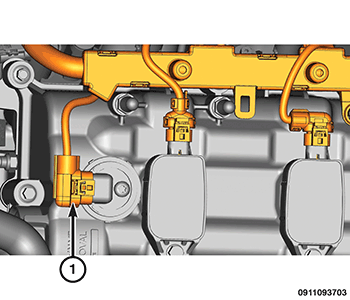
  10. Disconnect the wire harness connector (1) from the right side Camshaft Position (CMP) sensor.
    Image
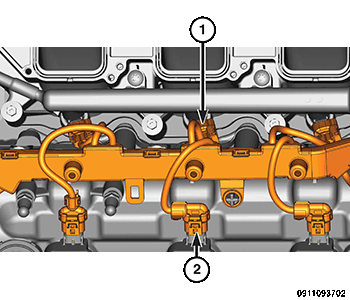
  11. Disconnect the injector (1) and ignition (2) wire harness retainers and position the wire harness aside. (This one is a bugger to get to.)
    Image
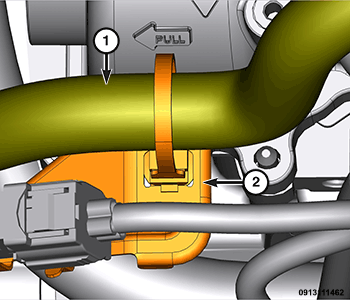
  12. Disconnect the wire harness retainer (2) from the rear of the cylinder head cover and position the wire harness (1) aside.
    Image
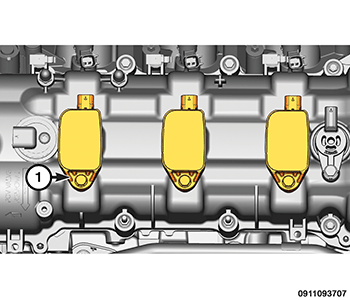
  13. Remove the right side ignition coils (1) (Refer to 08 - Electrical/Ignition Control/COIL, Ignition/Removal) .
    Image
  14. Remove the camshaft position sensor (1) (Refer to 08 - Electrical/Ignition Control/SENSOR, Camshaft Position/Removal) .
    Image
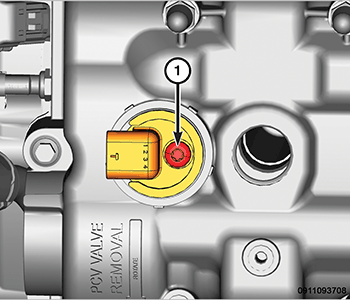
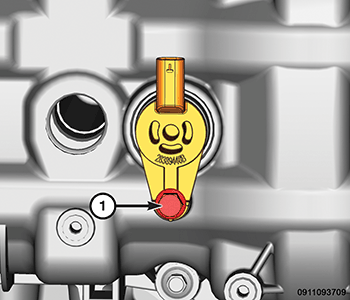
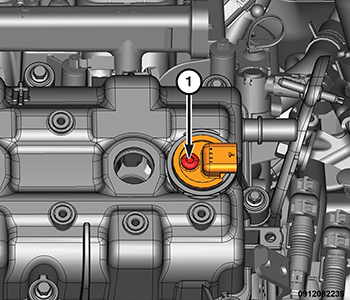
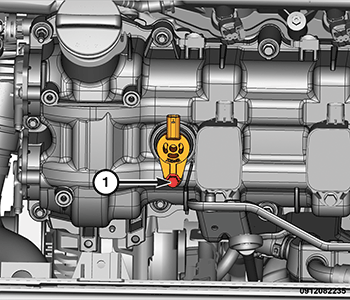
  15. Remove the VVL solenoid (1) from the right cylinder head cover.
  16. Remove the PCV valve (On my 2017 it was a twist out type, now is a good time to replace it if you have 100k miles on the engine).
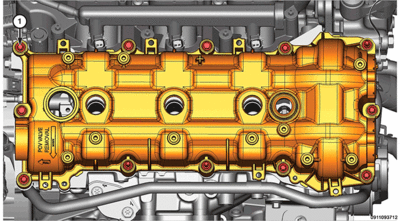
    Chrysler 2017WD-GUID-0911093712
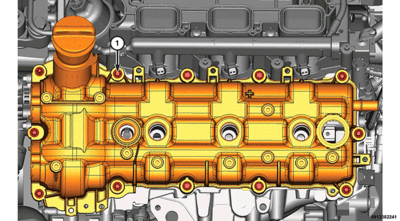
  17. Loosen the cylinder head cover mounting bolts (1) and remove the cylinder head cover (I was actually able to pull the bolts thru with some force, which makes it easier to reinstall the valve cover with them off but not required).
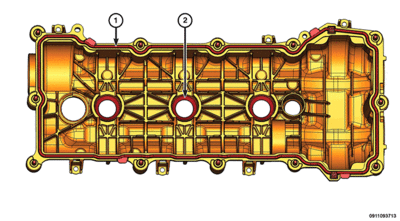
    Chrysler 2017WD-GUID-0911093713
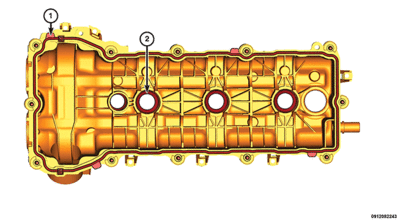
  18. Remove and discard the cylinder head cover gasket (1).
  19. The spark plug tube seals (2) can be reused if not damaged.
    CAUTION
    Do not use oil based liquids, wire brushes, abrasive wheels or metal scrapers to clean the engine gasket surfaces. Use only isopropyl (rubbing) alcohol, along with plastic or wooden scrapers. Improper gasket surface preparation may result in engine fluid leakage.
  20. Remove all residual sealant from the cylinder head, timing chain cover and cylinder head cover mating surfaces (Refer to 09 - Engine - Standard Procedure)(Refer To List 2). (I believe RTV is required to reinstall the valve covers where it is applied to the same location where the front timing cover meets the heads)
 
Discussion starter · #19 · (Edited)
Here is the steps for EGR removal. I swear this is so stupid that it has to be done to remove the valve cover! I am hoping to only remove the bolts shown in step 11 so the EGR can be swung out of the way. Going to attempt this without removing the alternator/generator.

REMOVAL
  1. Disconnect and isolate the negative battery cable.
  2. Remove the engine cover.
  3. Remove the generator.
  4. Drain the cooling system (does not need to be drained to move out of the way).
    Image
  5. Disconnect the EGR temperature sensor wire harness connector (1).
    Image
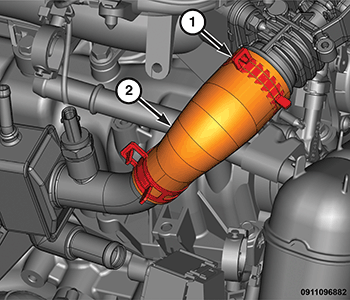
  6. Remove the EGR inlet tube (2) from the EGR valve (1). (So just below the lowest, smaller hose clamp you can see the plastic foot that will eventually hit the EGR tube as you try to remove the cover. It is because of that stupid foot that the EGR must be moved.)
    Image
  7. Remove the fasteners (1) securing the coolant tube and position the tube aside. (Those hose supports block one from removing the EGR bolts that attach it to a bracket that holds it to the engine block. Had those supports been designed to be out of the way all you would need to do is remove the 2 bolts from the EGR to swing it out of the way.)
    Image
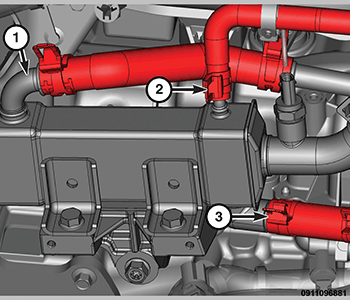
  8. Remove the inlet coolant hose (1) from the EGR cooler.
  9. Remove the inlet from pressurized coolant bottle hose (2), from the EGR cooler.
  10. Remove the outlet coolant hose (3) from the EGR cooler.
    Image
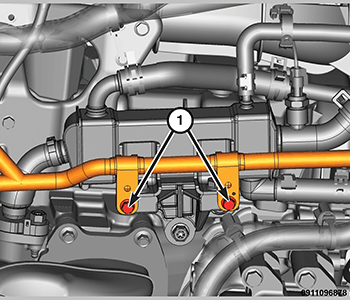
  11. Remove the lower bracket bolts (1) securing the EGR cooler. (Hopefully these are the only bolts that need to be removed to swing the front EGR tube out of the way. You can see the other 2 bolts I was referring to earlier.)
    Image
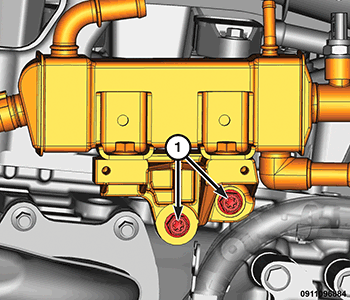
  12. Remove the inlet flange bolts (1) and the EGR cooler. (I am hoping the hose is flexible enough not to require the removal of the flange and hence a new gasket.)
  13. Remove and discard the gasket.
Image


Image
 
Discussion starter · #20 · (Edited)
For completeness, here is the procedure for the driver's side.

LEFT
NOTE

The magnetic timing wheels must not come in contact with magnets (pickup tools, trays, ect.) or any other strong magnetic field. This will destroy the timing wheels ability to correctly relay camshaft position to the camshaft position sensor.
  1. Disconnect and isolate the negative battery cable.
  2. Remove the air cleaner body (Refer to Engine/Air Intake System/BODY, Air Cleaner/Removal) (Refer To List 1).
    Image
  3. Disconnect the fresh air makeup hose (1).
  4. Partially drain the engine cooling system (Refer to 07 - Cooling/Standard Procedure) . (I did not have to do this to remove the valve cover so not sure why they mention it here, even on the passenger side valve cover they say it is not necessary to disconnect coolant lines to the EGR which is not on the driver's side.)
    Image
  5. Disconnect the wire harness connectors (2) from the variable valve timing solenoids on the left cylinder head cover.
    NOTE
    Mark the variable valve timing solenoid connectors with a paint pen or equivalent so that they may be reinstalled in their original locations.
  6. Disconnect the coolant temperature sensor wire harness connector (1).
  7. Disengage the wire harness retainers from the left cylinder head cover.
    Image
  8. Mark the variable valve timing solenoids (1 and 2) with a paint pen or equivalent so that they may be reinstalled in their original locations. (Visually they are different so all you need to do is to take a picture of how they are arranged when installed).
  9. Remove the variable valve timing solenoids (Refer to 08 - Electrical/8I - Ignition Control/SOLENOID, Variable Valve Timing - Removal).
    Image
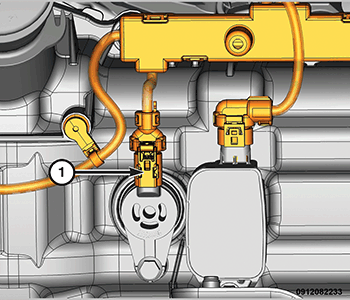
  10. Disconnect the left Camshaft Position (CMP) sensor (1) wire harness connector.
    Image
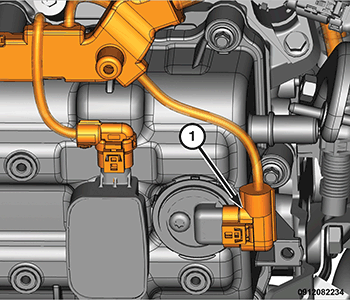
  11. Disconnect the Variable Valve Lift (VVL) solenoid wire harness connector (1). (On my durango this connector would not budge so I just removed the solenoid with the connector attached, there is enough slack in the line to do so once all of wire loom clamps are detached from the valve cover.)
    Image
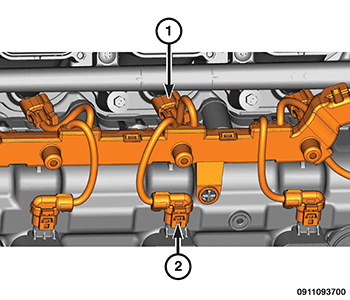
  12. Disconnect the wire harness connectors from fuel injectors (1) and ignition coils (2).
  13. Remove the wire harness assembly from the left side cylinder head cover and position aside.
    Image
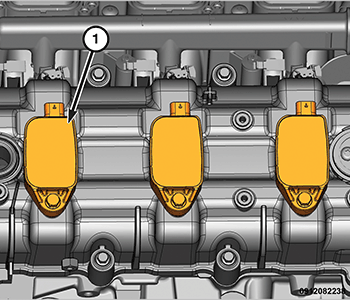
  14. Remove the left side ignition coils (1) (Refer to 08 - Electrical/Ignition Control/COIL, Ignition/Removal) .
    Image
  15. Remove the camshaft position sensor from the left cylinder head cover (Refer to Electrical/Ignition Control/SENSOR, Camshaft Position/Removal) .
    Image
  16. Remove the VVL solenoid (1) from the left cylinder head cover (Refer to Engine/Cylinder Head/SOLENOID, Variable Valve Lift/Removal) .
    Chrysler 2017WD-GUID-0912082241
  17. Loosen ten cylinder head cover mounting fasteners (1) and remove the cylinder head cover.
    Chrysler 2017WD-GUID-0912082243
  18. Remove and discard the cylinder head cover gasket (1).
  19. The spark plug tube seals (2) can be reused if not damaged.
    CAUTION
    Do not use oil based liquids, wire brushes, abrasive wheels or metal scrapers to clean the engine gasket surfaces. Use only isopropyl (rubbing) alcohol, along with plastic or wooden scrapers. Improper gasket surface preparation may result in engine fluid leakage.
  20. Remove all residual sealant from the cylinder head, timing chain cover and cylinder head cover mating surfaces (Refer to 09 - Engine - Standard Procedure)(Refer To List 2).
 
1 - 20 of 54 Posts