Hello all -
I'm new to this forum and am trying to find a fix for my 2007 Aspen (which is the sister car to the Durango) HVAC issue. I have seen the problem listed, but have not found any solution other than to take it to a dealer for a fix that costs more than $1000. I'm too cheap for that and think that I (and my hubbie and son) are handy enough to tackle fixing it ourselves.
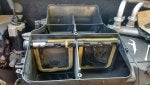
Problem: The heat and a/c only come out the top vents, no matter what the setting. In my research, it seems to be an issue with the mode door that is located at the bottom of the dash, above the driver's feet. There is an actuator that turns the mode door which will change where the air is directed - to the floor, upper vents, and/or the defrost vents. The problem seems to be with the piece that connects the door to the actuator - it is made of plastic and tends to break and so the connection is lost between the actuator and the door.
The Fix: Theoretically, the fix is to replace the broken connector thingy. In order to do this, you have to take the mode door apart.
Has anyone done the fix? We're not afraid to pull the dash apart and work on it. It's been posted that its at least a 5 hour job, that it's a little tedious, and a pain in the rear, but not overly difficult. We're ready and willing to take on the challenge. A little guidance would be helpful. I've seen a few videos on fixing the same problem in a Dodge Ram. Would this be the same?
If you've done this fix, I'd really like to hear from you.
Thanks!
-LizzR
I'm new to this forum and am trying to find a fix for my 2007 Aspen (which is the sister car to the Durango) HVAC issue. I have seen the problem listed, but have not found any solution other than to take it to a dealer for a fix that costs more than $1000. I'm too cheap for that and think that I (and my hubbie and son) are handy enough to tackle fixing it ourselves.
Problem: The heat and a/c only come out the top vents, no matter what the setting. In my research, it seems to be an issue with the mode door that is located at the bottom of the dash, above the driver's feet. There is an actuator that turns the mode door which will change where the air is directed - to the floor, upper vents, and/or the defrost vents. The problem seems to be with the piece that connects the door to the actuator - it is made of plastic and tends to break and so the connection is lost between the actuator and the door.
The Fix: Theoretically, the fix is to replace the broken connector thingy. In order to do this, you have to take the mode door apart.
Has anyone done the fix? We're not afraid to pull the dash apart and work on it. It's been posted that its at least a 5 hour job, that it's a little tedious, and a pain in the rear, but not overly difficult. We're ready and willing to take on the challenge. A little guidance would be helpful. I've seen a few videos on fixing the same problem in a Dodge Ram. Would this be the same?
If you've done this fix, I'd really like to hear from you.
Thanks!
-LizzR
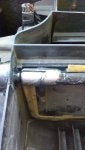
") I ended up installing a 1/4” rod down the hinge of the panel mode door and then I fabbed up an adapter to mate to the motor adapter. I epoxied the rod in place so it will not spin. Like you said in your post, it is tedious but not painful. Just take your time and you’ll do fine.
I ended up installing a 1/4” rod down the hinge of the panel mode door and then I fabbed up an adapter to mate to the motor adapter. I epoxied the rod in place so it will not spin. Like you said in your post, it is tedious but not painful. Just take your time and you’ll do fine.