I received both a smoked and a chrome LED rear third brakelight today so, without delay, I just had to go ahead and get it installed  Here's a how to with some photos.
Start to finish, 15 minutes max. It'd have been 10 minutes but the rubber gasket around the face of the light was installed unside down on my LEDs. I carefully pulled it off without ripping the rubber, flipped it over and put it back on with adhesive in the correct orientation. Had I torn it, I could have reused the rubber gasket off the OEM unit I was removing, so you'll have a built in spare.
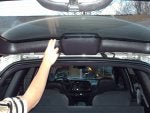
First, grasp and remove the plastic trim panel covering the rear third light (see pix below.) I found it easiest to reach up to the left of the light and work my fingertips into the gap. There are two nylon push fasteners on each side of the light and a steel slotted snap along the edge section on each side. Easily pop the cover off while pulling toward yourself. It'll simply pop off.
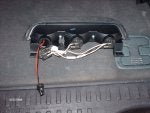
Once off, twist the light bulb fixtures 1/4 turn to get them out of the light housing. Remove the bulbs and set aside. You won't need them again.
There's a bolt on each side of the light housing with an 8mm head. I used a 1/4" rachet, small extention and 8mm socket to remove them. It's handy to have someone hold up the light while you're removing the second bolt, but not necessary. Set bolts aside for use in mounting the new LED housing back into place.
There's a snap connection on the wiring harness for power that runs up and back into the D. Simply depress the connector with the flat blade of a screwdriver (or your thumb) and slightly pull apart. One seperated, the light housing and wiring harness are free from the D.
The wiring harness is held in place on the OEM lighting housing by a nylon christmas tree type button/bolt. Carefully remove it from the hole in the housing. I used the flat edge of a screwdriver to pry it upward without damaging the nylon catches on the plastic bolt.
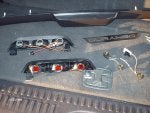
Once the harness is removed, place it on the new LED housing in the same direction it was installed on the stock housing. Press the nylon catch bolt back through the hole matching the location on the new housing to the hole on the old housing. The wiring in the harness plugs into the above snap connector and them into each of the three lighting plug areas where the bulbs were previously.
Snap the wiring harness connection for power back into it's proper place and let the LED housing with the wiring harness hang suspended from this plug for the next step. Do not mount the housing back to the D via the 8mm bolts yet.
There are wires coming off the the LED housing where the three light bulbs should go. The ends on the wires simulate the ends of the bulbs you removed. Plug them into the housing as if they were bulbs. Since LEDs are directional in how they get their current to make them work, if you place the plug in backwards (it's not keyed) the LEDs won't light up. It's best to have a helper depress the brake pedal while you're plugging in these sections to make sure you got it right. If not, here's hoping you guess right on each light and do so three times in a row so all the lights power up right out of the gate.
I had my helper depress the brake padel after I plugged in each wire-as-if-it-were-a-bulb section. If it lit up, I went to the next light. If not, I made sure it was fully plugged in and, if still not, then I unplugged the wire and turned it over and plugged it back in and had my helper press brake again to check that section lite up. There are multiple LEDs in each section replacing the single bulb for that section.
Repeat the plugging in process above with your helper depressing the brake pedal until all three sections work. Then gently feed the excess wire from each bulb area back up and into the light housing.
Once all 3 sections are done, simply hold the light up to the glass and replace the two 8mm bolts. Remember the rubber seal gasket on mine was on upside down initially, so make sure you check for this and flip it over and glue it back on before this step if yours is also upside down.
Tighten the two 8mm bolts to secure the housing to the D and have your helper depress the brake petal to make sure it all still lights up. I added a small piece of duct tape on each of the three lamp sections to prevent vibration issues down the road. Other than the tape, everything was plug and play.
Replace the D's rear panel you removed in step one and you're done!
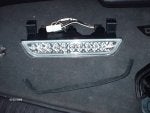
I can slightly see the chrome LED housing through my rear glass. Since my rear lights are kissed with chrome, and the D lettering is chrome on the tailgate, it matches my D and that's what I went with. The smoked version of the LEDs wouldn't be as easy to see through the glass so it's a personal preferrence there I guess. Once the red LEDs light up, both are easily seen so, it's not an issue of how the lights work when illuminated, but how the housing looks when not illuminated.
Done! See pix below.
IndyDurango


